John Mason London Grandfather Clock Head – Building a clock part I

Ok, so I’ve not reached the stage where clock snobbery is effecting me. It is a powerful and damaging condition that effects the vital organs of finance such as the wallet and debit card.

Ive have a Grantham made grandfather clock that has a tooth missing from the escapement cogg. While this is not a terminal condition for a clock, its expensive to get new wheels made and hard to find anyone who will do it. I therefore decided to replace the complete movement with something a bit better.

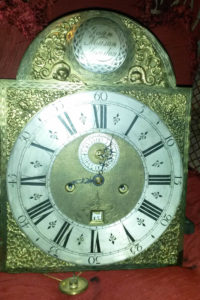
In grandfather terms “better” generally means older so Ive been looking out for an early 18th century face and movement for some time. My ship came in and now I have it. I know this is an early movement because the face dial is hand engraved and features the old one handed clock markings. You can see the quarter hour divisions on the innner chapter ring of the clock for this. There are a few other features that confirm its date to 1725 – 30 as well as the fact that John Mason, the London clock maker, was released from his apprenticeship in 1711.

The intention is to fix the assorted problems with the movement and then put it into my 1780 Grantham case. If you can get a good condition head its easy to build the clock you want to see. It does of course effect value if the head is not original to the clock but to be fair most old heads are in newer cases simply because the cases are the first things to rot and wear away.

Ill be doing a post on the finished article shortly. Im fizzing with excitement about building this thing and will be getting on with it!.

If you want to build your own grandfather you have to learn about clock face design in relation to date. Grandfather clocks, specially from London makers, are very regimented in thier design and certain features were incorporated for short periods so by examining things like dial size and clock face markings so its possible to date any clock within about a 10 year time frame. Brian Loomes does an excellent book on Grandfather clocks that I highly advise you purchase before looking for your components. Its on Amazon and Ebay most of the time and about £30 – 50. Well worth the investment to do your research.

Anyway, heres the clock head and watch this space to see where I get to with it!.
john_mason_london_clock


What a worn spring looks like

This post is really just for those interested in what “a worn spring” means.

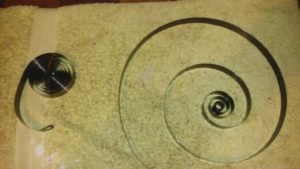
When a spring is wound it is peeled from the outer or the barrel onto the winding spiggot. Over time the spring loses its elasticity and starts to take on the shape of the spiggot as opposed to the outer barrel. This is a complicated clock repair because it takes some time to dissassemble the movement, remove the barrel and then extract the spring. A new spring must then be wound to a lower diameter, inserted into the barrel and then released to a snug fit inside.

The picture below shows the extracted spring and the new spring. You can seet the difference!.

20160917_181232


What to do when a clock spring repair goes wrong

The job

Sometimes things dont go as planned. In these instances its necessary to weigh up the options and get on with it.

I have been asked to repair a rather nice 1930’s regulator. The problem was manifesting itself as slow laboured chiming and illogical chime sequences. This is typical of a chime spring having degraded and lost its power over time. Chimes get halfway through and then just stop, only to restart as the beginning of the next chime sequence. It sounds as if the clock has lost its mind!.

At any rate the solution was a spring replacement which was measured and ordered. The owner of the clock decided to replace both the drive and the chime spring at the same time on my advice. Generally speaking, when one goes the other is not far off. Chime springs are usually the last to go as over time they get used less as people elect to turn the chime off.

This clock uses surpisingly strong springs. Spring strenth is rated on the springs thickness which ranges from .1mm through to about .7mm for most clocks. The spring is attached to the inside of the barrel by a metal pin drilled in and sealed as a rivet from the outside.

The unexpected problem

When I installed the new spring the pressure of the spring sheared off this pin and the spring would not hold firm in the barrel and slipped when tightened.

There were two approaches available here and thats important to mention. If you run accross a problem on a clock that you had not expected it really is important to just stop and consider the options rather than rush towards the first obvious method or fix.

Firstly I could source a new barrel but this would take time and its relative wear could cause unpredictable results. The other things of course is that you might be able to get the same guage of barrel but you would be very lucky if the style and colour were identical – new barrels are obvious visually.

The second approach was to use a spring attachement method I have seen on other barrels which invloves folding a tongue of the barrel inside to catch the loop on the end of the spring. This approach guaranteed a fix but also meant getting it right first time because if I underestimated the strength of the components the barrel or spring would split. So, to spread the load a bit at the join I created as wider V as I dared and then enlarged the hole loop in the end of the spring by 30%. The result was a strong effective repair. It looks a little brutal however it definitely wont slip or shear and the combination of a hardened steel spring edge on soft brass can produce spectacular breaks.

Ill now polish the barrel marks out and re-assemble the clock.

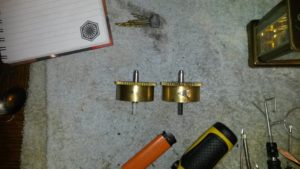
The pic shows both the repaired barrel and its twin (although not a strict twin as I found it had a slightly different strength spring). You can see the original pin in the left barrel. Note that I cut the poing of my “V” to match the position of the pin. This would ensure it had the best chance of catching the spring loop. To stand the V section ready to catch the spring I inset it (hammered it in) to the barrel so it was proud by about 3 or 4mm. It has to stand that proud to catch a fast moving loop that sets in when you release the spring in the barrel.


barrel_pin_shear_clock

Could I have done this differently?

Well yes is the honest answer. I could have hammered the bent barell back into shape. I tried to do this but wasnt bold enough and when the new spring went in it only half caught on what remained of the pin and sheared it even further. Next time ill go straight for the method I have used here as this is really the way the manufacturer should have done it in the first place. The method of cutting a tongue into the barrel was used later on in clock manufacture which I had assumed was a cost cutting modifcation. Having had to deal with the problem myself I can confirm is the better way in all respects as well as saving money in production. I find the same sort of modifications on modern chinese movements which are produced very cheaply but unbelievably well in terms of the no frills design.