Ok so Im doing another “how to” article to rob myself of work for some reason. Frankly, I like doing them and I get emails from people mid project seeking advice on these articles which often leads to good reviews or work so its all good fun.
To demo Im using a movement from the turn of the 19th century are quite robustly engineered. They have barrel pinion gears comprising of bars set between two disks. On a cast or cut pinion gear damage is pretty terminal dead parrot, however, these barrel pinion gears can be remade – Ive done quite a few. Its a good thing because these clocks are the sure fire stars of the future. Their art nouvau influenced modernism reflects Edwardian britian beatifully and they will only increase in value from a rissible low at the time of this article. Anyway thats what we are dealing with for this explanation on setting up the back of the clock and replacing the leaf spring.
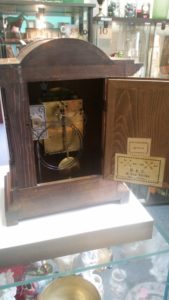
Heres the clock in all its glory. For sale at the moment as it happens!. Sorry thats a bit Quentin Wilson…back to James May delivery…


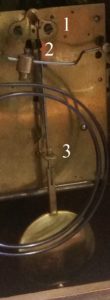
So what Ive done here is numbered each of the areas you need to pay attention to if your clock has stopped and what each thing does in the process.
- The pallet mounting assembly and fixing. You can only see the butterfly fixing bit in the photo but thats all you will be playing with. Each of the screws you can see can be loosened. When you do this the play in the fixing allows the butterfly to move a bit. This is to allow the distance between the pallets and the escapement cog teeth to to set finely at just the right height. As pallets wear the distance increases and the setting of the butterfly needs to be adjusted. See? easy!.
- The pendulum spring. Right you have to know what this does. It twangs the pendulum. I cant be **rsed to explain the recoil physics, almost frictionless carbon iron steel lattices, and the laws of Newtonian motion. As far as you are concerned it “twangs” the pendulum making its passage slightly more abrupt at each end of its swing. If twang has been lost the effect of this is that the spring starts to give the swing more friction and it wont stay in perpetual motion on the power input it gets from the paddles that push the pendulum sorry the crutch rod. In english this means they need changing from time to time. If the spring is kinked its knackered and get a new one. If the pendulum snakes when it swings check for a physical break in one side or a fracture in the spring – any of that at all and then its a replacement job.
- The pendulum crutch. For some reason clocks end up with poorly fitting pendulum crutches. The fit between the crutch legs and the pendulum rod should be just right. If you can hear a physical click as the crutch pushes the pendulum on each stroke then its not tight enough. A little bit of noise is ok but not a clack sound where the crutch is moving 20% of the pendulum rods diameter each side. You want it to be snug enough so that the rod is connecting for the longest time possible through the swing BUT MUST NOT RUB. If you need oil on it to make it work its wrong – it should work dry.
Any questions email me. Once youve done all this you might find the clock runs fine but only if you put a wedge on one side to take it off the horizontal. Theres a way of setting the beat on a clock I will cover in a later article that shows you how to simply adjust the pendulum assembly to allow for proper operation on an uneven / angled surface.
If its any more than these things to get your clock going then I operate a repair by post service that is very popular on all types of clocks. This is with the exception grandfather clocks although I do those if you are prepared to take off and send me the head, pendulum and weights.
I hope this article helped you understand your clock a little bit more and maybe even revived a recent acquisition of yours.

Recent Comments