
This is the second article on a rather large and advanced restoration I have been asked to undertake.
This part deals with the chapter ring repair. London style granfather faces are always a plate, a set of spandrels and a chapter ring. Sometimes there are other adornments but for the most part its just the aforementioned. To restore a face you need to get the chapter ring off and grind back any old silvering. You also need to remove the wax. Im not suggesting you do this yourself unless you have an old clock where its really a case or repair it or bin it. Its a genuinely difficult thing to do and takes a good deal of experience. Its not that the process is hard or complicated its just that you have to know the tollerances of the materials and have a set of jiggs you know the behaviour of. The reason I say this is that errors cannot be corrected. If you overgrind the engraving you ruin the clock. If you try and get the wax out with a needle and slip, you ruin the clock. If you blah blah blah you ruin the clock. You get the idea.
When I restore a chapter ring there are four stages. Firstly you need to thoroughly clean the face. This is a degrease, and amonia clean and a polish. Then a solvent wipe to create a completely clean surface. Once you have done this you are ready to apply the wax. This is what is used to fill the engraved numerals and markings on the dial. I use a shellac based wax that has an excellent lifetime and beautiful high gloss finish. Applying the wax invoves gently heating the cleaned face and then using the heat of the metal to melt the wax. As you can see from the picture below you dont take any prisoners with this as you really want 100% coverage and every micro groove carved into the face to be filled.
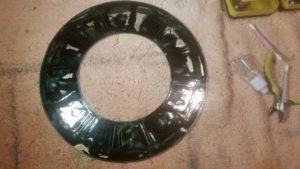
After the wax has set then its time to remove the excess to reveal the filled engraving. This invovles a spinning jig so that you can create and even circular “grain” in the metal. I use a 400 grit and hours of elbow grease to get it exactly right. Power tools are far to aggressive and a recipe for disaster so its all by hand. Doing it this way you get it exactly how you want to see it.
Heres the ring after a days grinding away on jig showing the un-silvered brass face with the excess wax ground away. As you can see the engraving is perfectly presented and filled to the edges of every cut. The engraving depth remains consistent because….well because I did it that way and took care!. This took 3 attempts as on the first two the final stage of heating the wax to a sheen resulted in seepage and the whole process had to be started from scratch. Thats just the way it is sometimes – every clock is different although they all look the same. Metal guage, alloy composition, engraving depth and complexity of engraving design all effect the way you approach a job so you learn on every single clock to a degree.
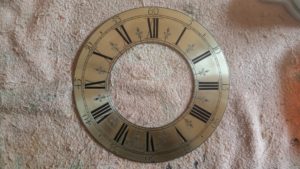
The following picture shows the finished dial fully slivered. This is not sliver plating – its ion silvering done cold by hand as it would have been when the clock was made. It relys on a chemical reaction that uses a sliver salt with water as a catalyst – great fun to watch and apply.
![20170612_222821[1]](https://braintreeclockrepairs.co.uk/wp-content/uploads/2017/06/20170612_2228211-300x169.jpg)
Im hoping the next article, part III, will be the finished clock in a few days time.
Recent Comments