This post tells you how to repair, by way of a service a simple carriage clock. You will need a good small screwdriver with a 2mm tip. Also you might find a good light, and some blutak useful.
Clock oil is a must. I buy mine from Priorypollishes on ebay and pay about £5 so its not expensive but it is worth getting the right stuff.
For this exercise I am using a friends rather nice Matthew Norman miniature carriage. The reason for this is that it doesn’t chime and doesnt have all the mechanics for the chiming that make taking a carriage clock to bits for repair more challenging. The process I use can however be applied to chiming carriage clocks, its just that you will have more parts to disassemble / assemble and its probably a little too difficult for somebody who is new to clock servicing.
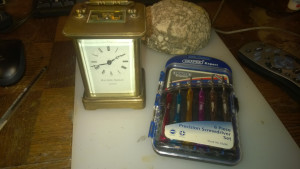
First UNWIND THE CLOCK. THIS IS VERY IMPORTANT because if you take a wound clock apart it can injure you. Some of the compression points between cogs can have a very high gearing so even a weakly wound clock has the capacity to trap or pinch your fingers as well as throwing out components that seem to head directly for vulnerable points like eyes!. So..
PUT YOUR PROTECTIVE EYE WEAR ON. If you dont have any go and get some. It really isn’t worth proceeding from this point onwards without it. The risk is high quite frankly and I was stupid enough to have a couple of close calls before I got the message. Don’t do the same as you might not be as lucky.
To unwind the clock you will obviously need the key. If you don’t have a key don’t unwind the clock or go any further until you have a key that fits.
The reason for this is that you need to hold on to the key while you release the ratchet that holds it against its spring pressure. When you do this, if you don’t have a firm hold on it, you might find it spins out of your hands or even get thrown off its spigot towards your well protected eyes (clever you).
Sorry to shout about this but, as I say the risk is high compared to other things that you would normally wear protectives for.
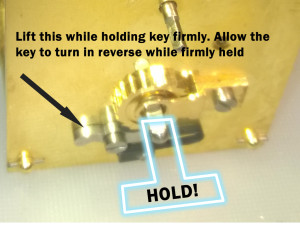
Have a good look at the picture below and hold onto that key before you release the ratchet. Once you have released the ratchet you will feel the pressure of the spring through the key you are holding.
Unwind the carriage clock in half turns and release / apply the ratchet between the turns so that the spring pressure is always managed by either your fingers with a firm hold on the key, or by the ratchet being allowed to stop the backward movement.
IF YOU RELEASE THE KEY WHILE THE RATCHET IS OFF THE CLOCK MAY SLIP ITS MAINSPRING. So…make sure you have the key under control at all times when the ratchet is off.
After you have unwound the clock the next thing is to get the case apart and the movement out.
Follow the instructions below fully before you carry them out. This is of course unless you want a load of broken glass that is very hard to replace on your floor. Most panels for carriage clocks, specially older ones, are hand made and hand ground / bevelled on the edges – expensive and hard to match so its well worth taking your time with the next step and getting a good idea of what you are going to do in total before you do it.
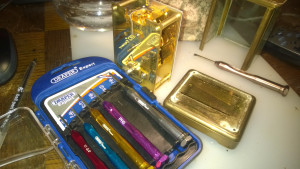
Always keep a firm hold on a carriage clock. They are slippery and heavy.
- Look underneath the clock. You will see 4 screws in the corners that hold on the pillars.
- Unscrew these screws for 5 turns each. If the first one come out after 5 turns then screw it back in a bit and only turn the remaining screws a couple of times.
- Holding the clock firmly examine what effect unscrewing the screws has had. You will see the pillars have become loose and, importantly, the glass can now move in the frame a little. The reason I have put this step in is because if you unscrew all the screws completely without understanding that the glass is loose, its very easy for you to allow the glass panels to slide out (all at the same time so you cant catch them) and break.
- Now you understand how the glass moves, carefully unscrew and remove (to a pot) the 4 screws while supporting the upper cages / glass with your fingers. Do this slowly and carefully and you will be fine.
- Having removed the upper cage, unscrew the two central screws on the bottom of the clock. This will release the movement.
After all that you are a good way into really getting down to the fun and complicated stuff! It should look something like the following photograph.
The next thing to do is remove the platform escapement. This is shown in the pictures below and is achieved by removing the four (or 3 in some cases) screws that attach it to the movement. A good trick here is to lift the platform out with the screws unscrewed but still sitting in their holes. This makes putting the unit back on later much easier. If you take the screws out completely and put them in a pot be prepared for some fiddly relocation work on replacement.
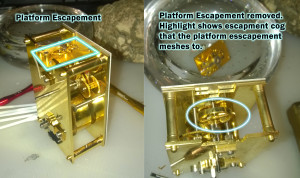
The next stage can seem a bit scary but if you follow the instructions then you will be fine.
ENSURE YOU HAVE UNWOUND THE CLOCK AT THIS POINT GO BACK TO THE BEGINNING OF THIS POST TO SEE HOW TO DO THIS SAFELY.
Now to separate the plates and reveal the cogs….
To do this place the clock on its front down. You may like to place a fluffy towel under the clock with this part. It helps to hold the clock firmly while at the same softening the effects of any jarring movement you might cause buy taking the lynch pins out.
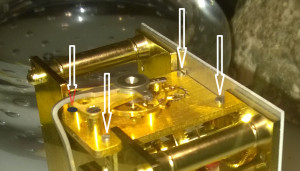
The lynch pins are located on the back plate of the clock where the pillars holding the two plates together meet. The following picture shows the clock (not lying on its towel but forgot that photograph) and the location of the lynch pins. The pins, which are wedge shaped, should come out in the direction shown but they may have been put in backwards to you will have to work the other way. If this is the case be really careful not to scratch the plate while doing so. If its an option always withdraw the pins in the direction shown to avoid this.
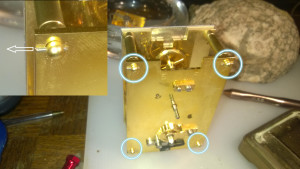
These need to be eased out of their holes with pliers. Be careful to move gently here as a slip with the pliers can scratch the back plate. This can even be when your pulling away the pin as it can come out suddenly. As your muscles react to regain control after the jolt its very easy for the movement and pliers to collide. The trick is to gradually increase your pull until it comes out less suddenly rather than tug at the thing.
Be careful as you take the last lynch pin out as the plate will then effectively be loose other than its seating on the pillars. You can see the plate partially disengaged with the lynch pins removed in the picture below.
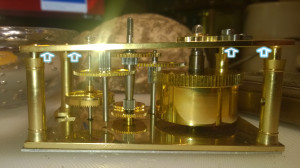
All the cogs, or most of them, will stay in place connected to the bottom plate – rather like a small group of trees.
So after removing the top plate you should be looking at something like this.

TAKE A PICTURE OF YOUR CLOCK NOW LIKE THE ONE ABOVE. This will be your reference point if you get lost during re-assembly.
Now its time to remove the cogs one by one. An order of removal will become apparent as some cogs are blocked by others. Place the cogs on your workbench in the order in which your remove them (see next picture).
They will all lift out even if some appear to be stuck in a little – this is old oil and dust mixed which can act like a glue and is probably the reason you are servicing the clock (to remove it!).
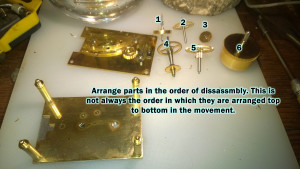
Clean the cogs with a soft toothbrush. Soap and warm water will do fine. Don’t bother with solvents. Some solvents may clean off the numerals from older clock faces – nail polish remover is one of the worst for this. Its not that the solvents will do any damage to your clock but if you have them on your fingers later when you handle the clock face you may well wipe off a few numerals!.
The main cleaning job is the holes in the plate where the spindles of the clock fit in. A great tip here is to use minature dental brushes. The rest of the cleaning should really be done with cotton buds. Its the only safe way to assure no scratches from your cleaning tool. So take more time and use cotton buds for cleaning and drying (they can be used as mini mops!).
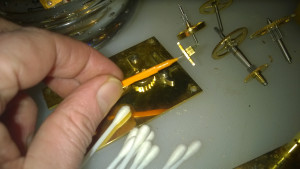
Once you have cleaned all the oil you can see in the holes and any on the cogs themselves you are ready to put the clock back together. This is simply the reverse of disassembly.
The really tough bit here is to get the plates back together with the cog spindles located in their holes.
A good flexible light source is almost essential for this stage
So, do the following.
- Place the cogs and spindles into the back plate to recreate the “forest” of cogs. Refer back to the picture you took if the cog positions are not obvious (I constantly have to do this).
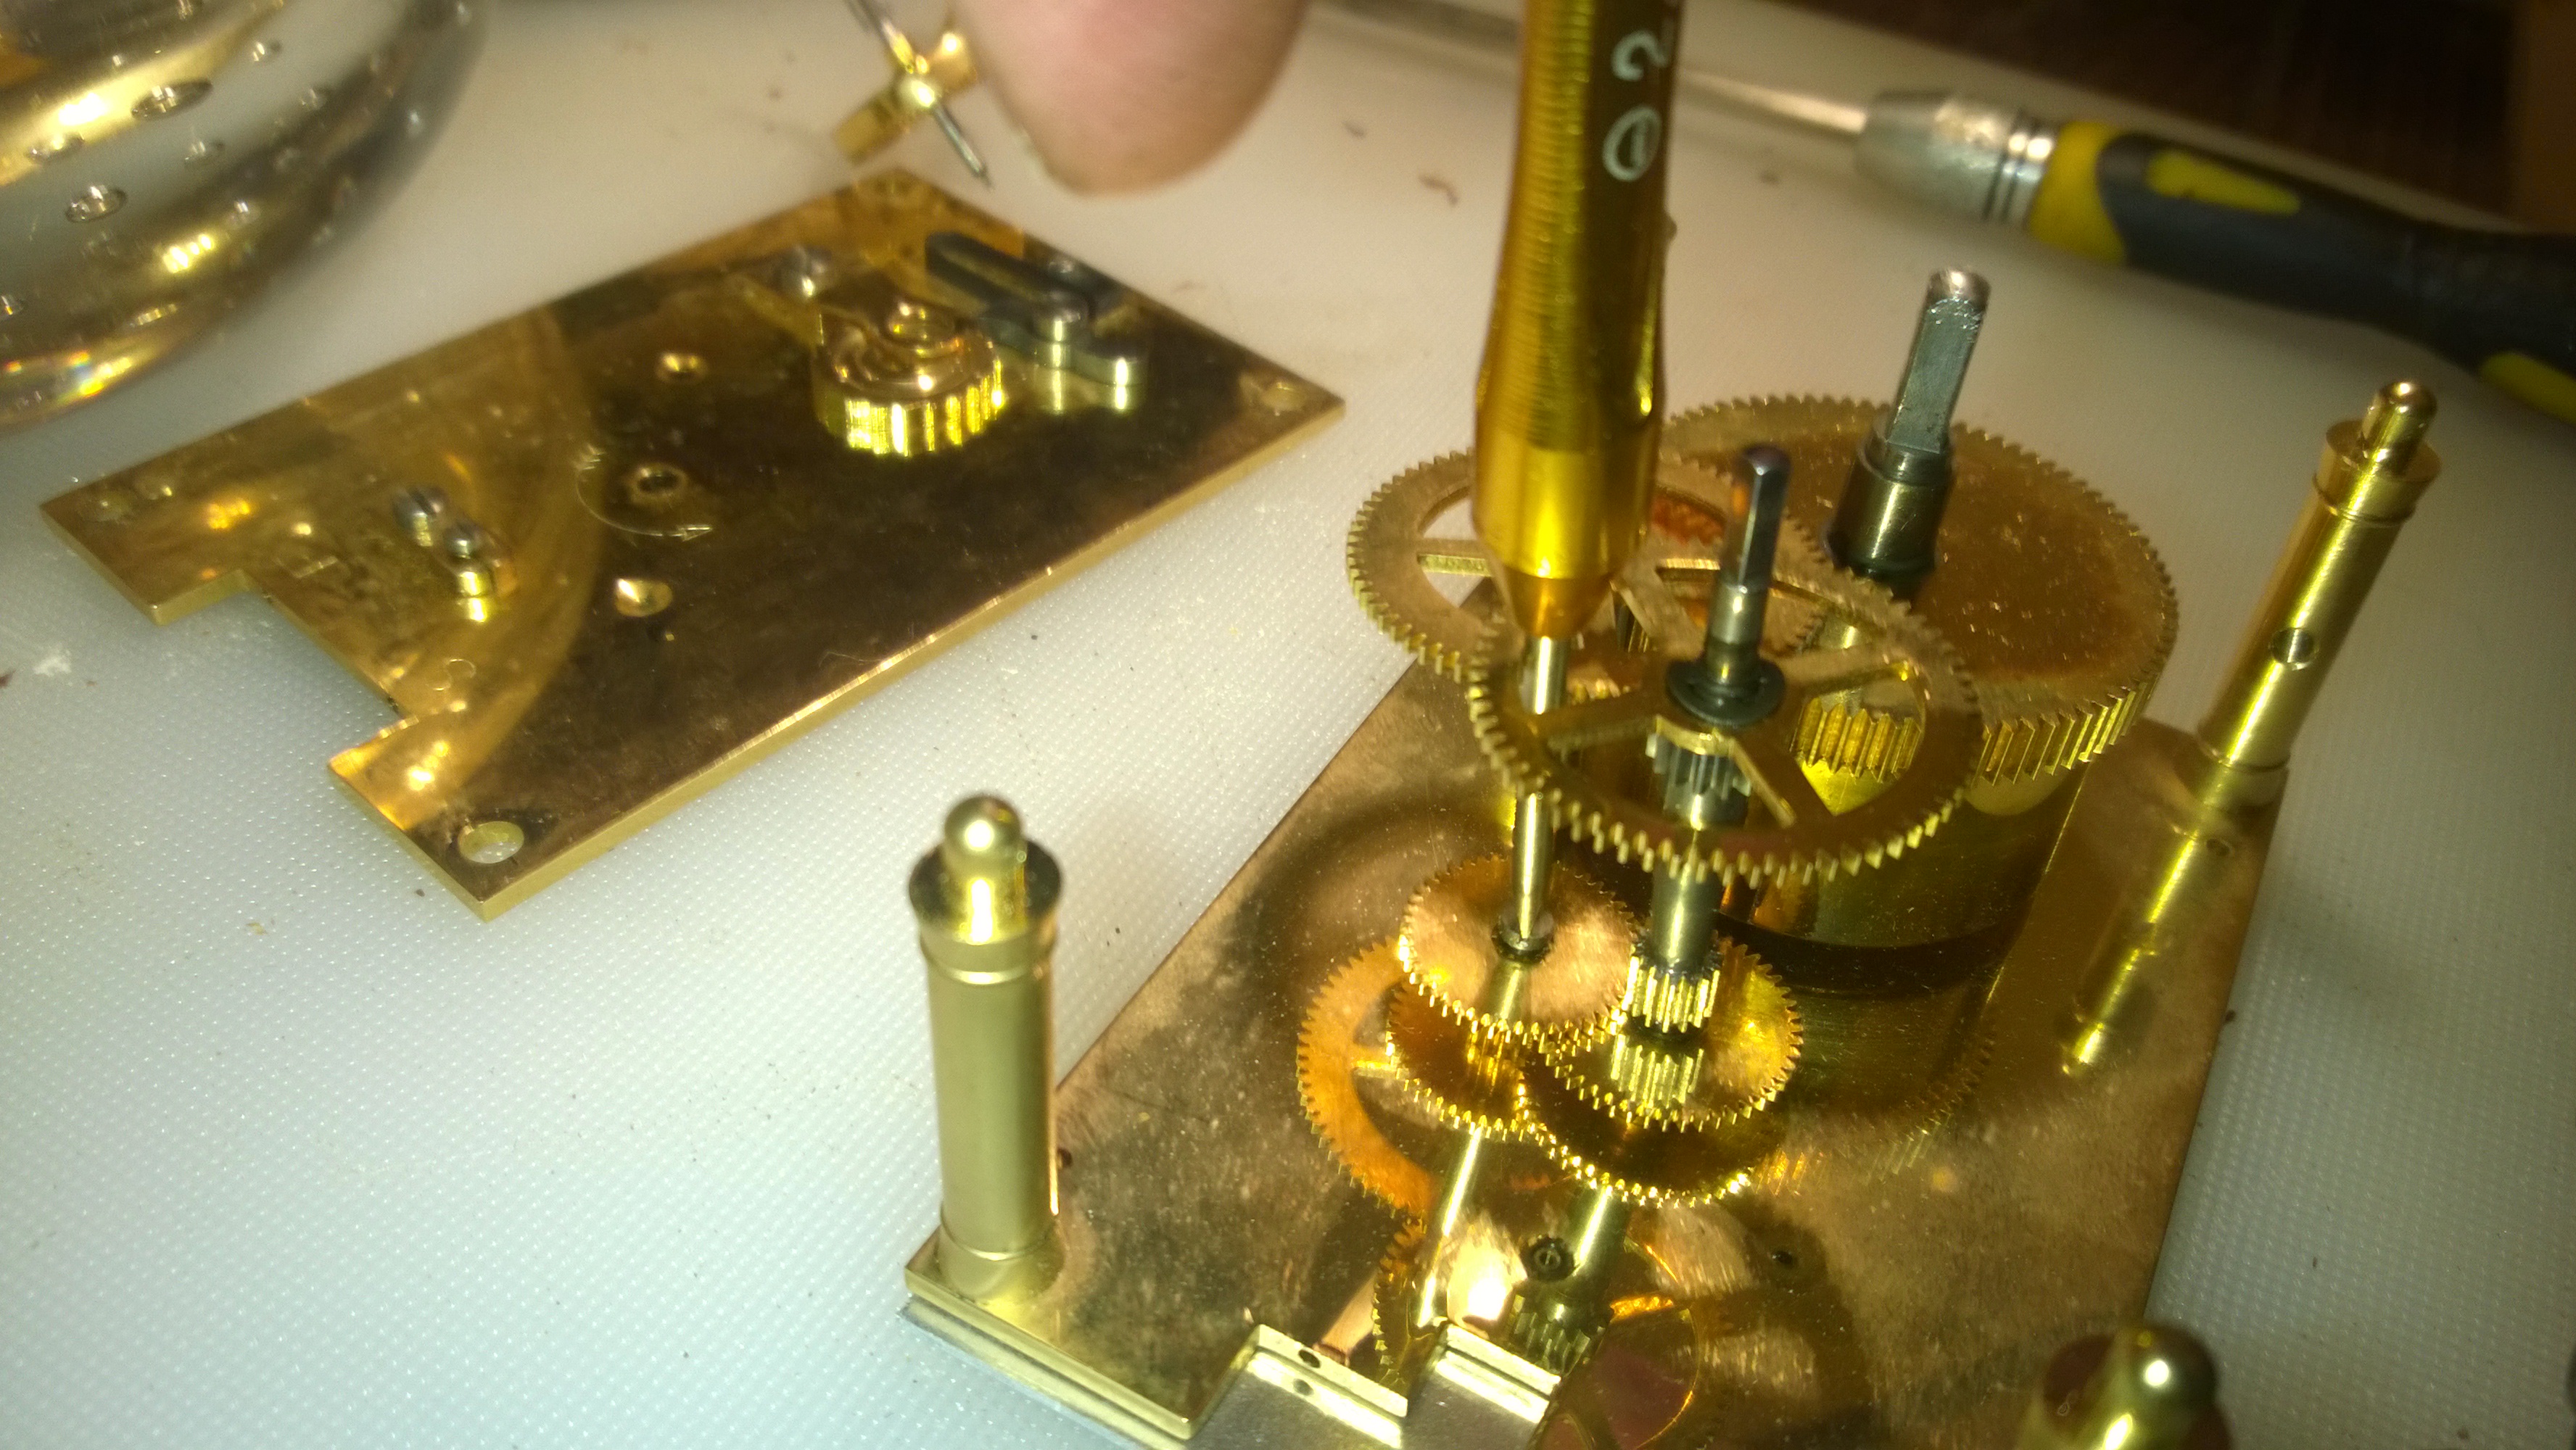
- Place the top plate gently in position allowing the tallest cogs to locate through the plate first an then let the PLATE REST on the remaining un-located spindles.DO NOT PUT ANY DOWNWARD PRESSURE ON THE TOP PLATE. This will bend or snap the thin cog spindle ends. You just have to be patient and follow these instructions.
- Look inbetween the plates as viewed in the next photo. You will see some of the spindles are supporting the top plate, while others do not reach it and are skewed as they lie on the other cogs.
- Move each spindle, starting with the tallest into place until you hear or see the top plate fall and then rest on the next highest cog. Repeat this process until all the cogs are in place and the movement sits flat on the plate pillars with all the spindles located.
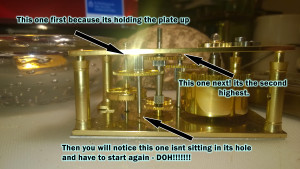
A good tip here is to use the lynch pins. When one corner of the clock is located completely on its pillar (while the others may not be), place in the lynch pin, finger tight, just to keep that corner where it is while you continue to prod the cogs with a pencil or pair of tweezers. This really helps with the last spindle or two as its very easy to put the last spindle in place and the whole plate then see-saws pulling the other spindles from their holes. Very frustrating!
Step 4 is fiddly. Its annoying and heartbreaking. Its pure pain. Its hard to describe.
Oddly once you have done it once…. you can do it again in 50% of the time and then 50% of that time!. You genuinely learn through adversity. The bottom line here is just carry on until you get it because you will eventually get there. Taking a break can be a huge help after about 10 minutes. I got there the first time after about 5 tries but now I can do any carriage clock first time.
Once you have completed this you can proceed to re-assemble the remainder of the components in the order in which you took them off..
Lastly oil the spindle holes. Avoid if possible oiling the cog surfaces. Technically speaking oiling the cogs will make the clock run a fraction more smoothly but it was designed to run without oiled cogs. In a fairly short amount of time dust from the air will stick to this oil and gunge up the cogs as well as the oil in the spindle holes. Having said that the spindle holes collect dust much less quickly because they are enclosed apart from the exposed end of the spindle visible through the plate. In essecence oiling just the spindle holes means longer intervals between cleaning. Its something you might have to do if the spring is losing its power and you want to give the power the best chance of transferring efficiently from cog to cog.
Good luck.
This isnt a defacto guide on how to do this and I would not attempt this if you are not a competent fixer or mechanically minded. While I hope my advice is helpful I am not responsible for what you might do to your clock and, really, the best idea is to get it serviced by somebody like me.
At the very least I hope this gives you some idea of how the clock works and encourages you to get a stopped one back into service yourself or by a repairer.
The next blog entry will be replacing a suspension spring on 400 day anniversary clock. Another tricky job that you can just about do yourself.
If you have any questions just post them as comments here and Ill get back to you. All comments and feedback is welcome. I want to make this blog interesting and useful so requests for content or comment on existing content is all good!.

Nice article to show how my carriage clocks fit together . All very shiny too. I had a bizarre little fault with one of my wife`s carriage clocks. There was a small chip in the glass hidden away near the top edge .I took no notice of it at the time. When the clock refused to run I looked and peered with magnifier clip-ons on my specs. Only when I held it at the right angle under the light I saw a sliver of glass 1/4 inch square lodged between two cogs. One wheel arm going north and the other wheel arm going south held this stray splinter in place. Since then other minutely thin layers of glass have shown up .So beware of leaving splintered glass in place . Bevelled glass behaves in very unusual ways . Similar to when a car window gets smashed. You`re still finding bits a year later .
I am glad you liked it John. I actually produced that repair article for exactly the reasons you said you enjoyed it so Im dead chuffed about that!. The thing I like the most about carriages is that you can see everything “happening” in there. I think people take one look and assume its all too difficult to understand but really it isnt. Once you do understand whats going on and how it all connects up the clock really does become even more interesting. If you like carriages then think about a Kern or Kundo german suspension clock – these are the ones with exposed mechanics under a 6 – 14″ dome (depending on model). They are brilliant to watch working, and even more so when you understand how the whole thing is driven round the oscillation of the suspension wire. Ive got one in rebuild at the moment which Im putting up for £65 if you want one from a reliable source, or ebay could do the same for you providing you buy of a clock person and not an attic raider. Thanks for you post – the page gets quite a few hits so its nice to get some feedbac on it. Cheers Justin. Oh – the one im selling is the blue faced one in the blog post about changing a suspension wire
One more thing John – about the bit of glass. Carriage clocks have quite fine movements. This means very accurately cut cogs on a smaller scale that wil most other mantle type clocks. While your boulder of glass would have been more than enough to actually damage the clock, its doenst take much of an obstruction to stop the upper cogs at all. The further the cogs up the train vertically, the easier it is to become sluggish or stop.The rule with carriage clocks generally is not to tighten up cog linkages (where adjustable) too much. You have to give the finely cut cogs a micron or two in breathing space in thier meshing – its the same micron the dirt gets into which is why they tend to need cleaning more regularly. Get yourslelf some good jewellers screw drivers (thats all you need) and have a go on a clock thats on its way out or that you can live with having to hand over to someone like me if you have to give up. Its well worth the investment of time vs. the payback on saved servicing costs. I wouldnt recommend it to anyone with one or two clocks as its probably easier to get me to do them once every seven years at £50 each. If you have a collection however then you should be able to service some of the simpler (not chiming) ones yourself, Before you do this check your clocks value – some of them are not worth risking self service damage as condtion is everything in clock valuations (and of course any valuable clock is usually named \ known maker).
Thanks for a really useful and informative article.
I’ve just been given a dirty and tired non-running miniature carriage clock. Your guide gave me the confidence to get inside and successfully give it a clean.
Ok, so the downside is that it’s still non-running – but at least it’s now clean 🙂
Thanks for your posts