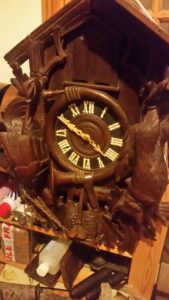
This is a Gough I am working on among other things and this article is well worth a read if you want a decent quick backgound in early long case manufacture.
This clock is the one I referred to in my last post that I was fizzing with exitement about working on and Ive not been dissapointed. Its a really early clock as I suspected and is both rare and very interesting. Its says a great deal about early long case clock making and would sit well in a museum.
A bit of background about early grandfathers thats relevant to this clock and understanding it…..
The longcase evolved from the use of a pendulum as a regulator in 1658. Huygens the astronomer invented it ironically. This changed clockmaking from something very difficult to do, to something a bit easier and basic. A pendulum regulator means simpler mechanics and a cheaper design. Thats not to say the clocks were “everyman” but it meant the price of one came down from Porche type money to mercedes pricing. The knowledge of the engineering skills and the industrial organisation was in place to build the clocks so, even early on, parts like dials, chapter rings, the movement, and the engraving were separate skills carried out by separate guilds of craftsmen in separate locations. Knowledge was passed on via rather long apprenticeships – specially on the movement side of things so….. we can say this Gough clock was probably made by a third generation of clockmakers at a time when there were not that many.
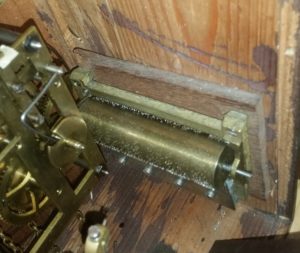
Style was instructed and controlled by the apprenticeship system. Innovation and change were not part of the apprenticeship, quite the opposite. It was market economics and aesthetics that evolved style within these tight and norrow guidelines, specially in London which led the country in defining the fashion of the day. This means you can date a London clock from nuances in the style as it changed over time quite accurately. The style of this clock is consistent with 1700 or earlier in the London style, but, this clock is from Devizies in Cornwall which is odd in itself. Having said this the movement is entirely different from any London clock Ive seen with a single chain drive and cage. Anyway, all knowledge spread from London where style was strictly controlled and the further you go away from London at any particular period, the more deviation from the standard you tend to see in the design. I can only assume this chap emigrated from London down to the West country having served his apprenticeship at a London maker or, more likely was buying in the whole face from a London maker which is not unheard of by any means – guilds and demarcation made this style of manufacture and sourcing popular and acceptable. On balance is probably the latter bearing in mind the exotic movement design which I will cover in the second article that will follow completion of the restoration.
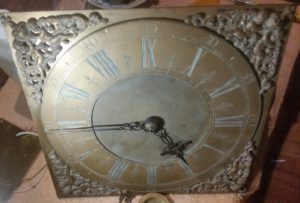
I’ve not researched Gough beyond some basics that he traded as a clock ans watchmaker up until 1730. The dial size and square face (no arch) tells me, within 10 years when this clock was made so Im reasonably confident at 1700 or a little earlier. The other major give always on the date are the lack of the seconds hand. Early long case clocks were thought to be unbelievably accurate already and the idea of “seconds” was just alien to people. It wasn’t a unit of time in every day use. Further dating evidence comes from the quarter hour markings on the inner chapter ring that were included so people could read the clock one handed. One handed clocks preceded two handed from about 1660 to 1690. After that two handers were the norm but needed to have the old one handed legacy markings so people unfamiliar with two hands could still read them. For them hours were measured and referred to in quarters, not minutes which meant maths and education. All this, in conjunction with the larger dial plate and (they increased in size from 8″ in 1660 to 12″ in 1700 at 1″ per year”) nails it to about 1700.
At the moment it looks like a dull monotone boring clock. It isn’t. Its a thing of massive beauty underneath which I intend to show. So to the restoration…
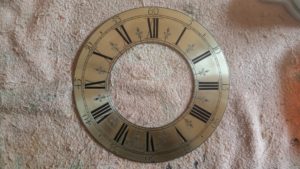
I am guessing the silvering wore off in patches and the wax fell out of the numerals to such a degree that somebody just gave up and wiped it all off in order to maintain some level of neatness. I’ve considered the possibility that the chapter ring was not originally silvered or filled with wax as I know there were some brass chapter ring clocks out there at this time. I’ve seen a few and they are just a clock face carved into brass really, single plate and engraved outside the parameters of the London style. I checked for old wax in the dial grooves at their deepest point but there is none, annoyingly. There should be some there. In addition to this there is absolutely no remnant of chapter ring silvering.
The thing is that this clock is so typical of the London face design that it is almost certainly a standard design clock where the wax and silvering has been steam cleaned (or the equivalent) as opposed to a naked all brass facsimile. Apart from this it has to be considered that there is absolutely no advantage commercially in the maker not finishing it off 100% London, having gone to the trouble and expense of getting to the point where its a couple of simple last stages. The clock would have been worth more in the London style that always led the fashion with its conservative values and quality; so he would have finished it a such.
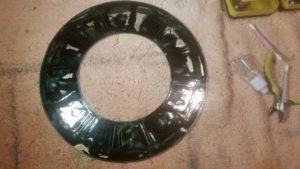
This clock therefore needs re-silvering and waxing by hand. There isn’t any other way to achieve the intended result so you have to use the original processes and materials. Its very basic stuff that shares little with modern production processes. The chapter ring picture below shows the easy bit of the waxing process. Taking back the wax level with the engraving is the next bit.
You cant use the processes or power tools you might think as the shellac is glass like and to compound things the sheet metal production of the era wasn’t up to much. The thickness and relief of the sheet varies. If you grind it with the straight edges on power tools you will end up taking the top of the relief off and inevitably wearing away the engraving in some places more than others. This means hand tools and judgement and no second chances because there are no spares or routes back other than re-engraving. If you have to re-engrave for any reason you might as well scrap the clock because it looses the authenticity. Wear off the engraving and what you have is a sheet of brass on which you can, at best, make a copy of what was there before.
I hope this has been enlightening and if you have a clock like this you want restored you know who to call!.

![20170612_222821[1]](https://braintreeclockrepairs.co.uk/wp-content/uploads/2017/06/20170612_2228211-300x169.jpg)
Recent Comments