Robert Youell Grandfather Clock Restoration


20190524_010454

This Robert Youell went out this week. Overall the job involved restoring the face completely and the movement got a good service and tighten up generally. Things wear and the odd washer is required here and there as well as resetting certain components to allow for connecting face wear. We turned this around in I think under 4 weeks, but to be honest I did it quickly because I couldnt wait to get stuck into it.

My favourite grandfather clocks, as readers of this blog will know, are the machines from 1690 to 1730. For me this is when it really was all rock and roll – the enlightenment was ongoing and our scientific bedrock was being laid. This shows in the clocks.

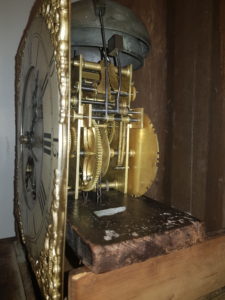
Once the long case clock gets going in about 1660 things are pretty basic. It takes about 50 years for a guild system and agreed design standard to be accepted and used. The clocks start small in 1660 mainly as cage based movements. These are driven by a single weight driving the two essential trains for a chiming clock. By 1690 the two plate system with 3, 4 (commonly) and 5 pillar stantions to create a rock solid base, had emerged. Operations for chime management had been moved to the front of the forward plate keeping things organised, accessible and modular. This change and modularisation of the design, in my opinion, catalysed more innovation.  The clocks while mostly the same mechanical design, sometimes featured innovations such as shut off switches and chime set methods / gateways.

This Youell is a well made and has the following innovations.

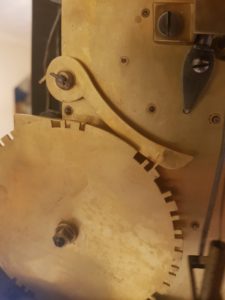
  1. It has the countwheel that controls the sequence of chimes mounted directly onto the barrel. It the best way to do it but means engineering the unit with about 8 or 9 hand fitted components. You can do it with half that using a traditional barrel and and externally mounted countweel. This has been done on this clock just to keep it all contained, neat and tidy. Quality craftsmanship and values.20190524_010420
  2. The escapement cog is in the ‘wrong’ place. All the other clocks have one more gear in the gear train. This has one less. That means the escapement cog is mounted near t he centre of the plate. It also means that the power to the escapement is a whole gear higher than on an equivalent clock with the same weight but the “right” amount of wheels. Its brilliant. The machine runs on a weight about the same as two cans of baked beans, the clock has not been rebushed, yet maintains its integrity around the pinions because they have simply lasted longer under less pressure. Maybe this clock is some sort of skunkworks black projects research clock. Surely if you get an innovation like this it would be adopted more generally because I simply cant see any downside with it and considerable obvious advantages.
  3. The third is not an innovation but points toward the overall mindset of the chap who designed it. The triggering mechanism of the drive train is borrowed from its lantern style cage movement predecessor. Having said that he has actually taken the stop mechanism from a cage clock and connected to the aforementioned triggering mechanism. So, he’s been good enough to take the best of two designs and mix them beautifully into something that is better than either.

It shows this chap to be a brave and clever maker.. The movement demonstrates a desire to produce something beautiful mechanically – tidy and precise, at the cost of complexity and the essential use of superior crafting skills including geometry and mathematics.

Engineering this tight means pretty thorough design and precise construction. I mean some of it can be done as a custom fit progressively but the majority of the clock has to be very accurately constructed because thats the way the chap wanted it to look. I should probably stress at this point that this is the first clock Ive seen like this and I see maybe one clock in 50 where you say “hey now thats really interesting”.  When the job is a restoration this is all the better as you get to know the clock very well.

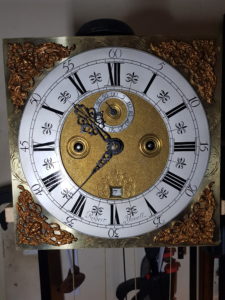
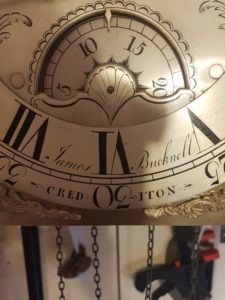
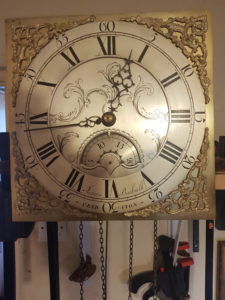
The  dimensions (11″ which strongly indicates 1690 to 1700) and layout of the face are typically London but have subtle differences. The half quarter markers are abstract as opposed to fleur de lys and it doesnt say Fecit Londini after his name which was the form at the time. So its a bit of a contradiction because I believed that the majority of quality makers capable of the early innovations previously mentioned were operating out of London at that period.

I wouldnt have expected these mechanics in anything earlier than 1760 or so. But the clock face and particularly the centre chapter ring are very typical of an early clock. Its also a square face. This in itself doesnt date the clock particluarly accurately as clocks were made with arch section or square face from 1700, but arched only after 1700. So a square face is what you would expect on a clock with all the other pre 1700 features. It looks like a really advanced clock from 1690-1700 to me. The other thing that pushes me heavily towards this date is that the fittings on the back of the face plate are absolutely right and original. Hand made nuts for the spandrels that are unique to each spandrel and not interchangeable. Ive found that tthis dissapears or changes to a neater design mostly after about 1730. The ones on this clock really look “hand made” – you can see the file marks and the slots are off centre. Its the little things like this that give the best clue to a clocks authenticity and age.

The face is very well engraved. Theres not a lot of it but what there is is exceptionally high quality. The name and other script could have been written with a fountain pen its so stylised.

It was a pleasure to restore this one as it had not been done for I would guess about 100 years. In the meantime a layer of laquer had been applied and some areas had aged badly. We managed to restore it with traditional hand methods to near its former glory although we left the guilding on the spandrels intact and simply cleaned and lacquered them. The chapter ring, date wheel, and seconds chapter ring were all re-silvered to good effect and then sealed with oxidation resistant lacquer.


James Bucknell Crediton Grandfather Face Restoration

20190426_124342[If google has brought you her because you want to know “how to reset the chimes on a grandfather clock” then skip down to the blue italic text. Note that this fix method only works with countwheel based grandfather clocks]

This James Bucknell from about 1780 (from the look of it) is a great clock I enjoyed restoring and repairing for many reasons. Firstly I like a challenge every now and again. It came to me in a bad cosmetic state, silver oxide blackened chapter ring, corroded spandrels and a face plate that really needed some attention.

Doing these faces is interesting work with a “good reveal” as you completely change the character of a clock by returning the face to pretty much the state it left the makers workshop in. I use traditional hand methods because they are the best. They offer accurate delicate control in the clean up and spinning stage and a sense of security that the job is properly executed with the correct amount of plate in the later stages. There really isn’t any point in hurrying it.

I’m often not the first person to have refinished the chapter rings on the clocks I do and it makes me weep sometimes to see how much the last goon has skimmed from the face, often removing character serifs and fine detail. I put this down to lazyness induced use of power tooling. Power tools and clock faces do not mix.  On the other hand you do want that spun effect so some abrasion is necessary if only to set the circular grain. Its a delicate balance and all the more interesting for it using the trad methods although its a bit slow.

When Im working on antique clocks I cant help being aware they are pretty much engineering historical record. There are not many other engineering diciplines that have a preserved evolutionary chronology in the way clocks do and these 17th,18th and early 19th century clocks are the history ecapsulated. Each genuinely carries a story and its not so much about who made it specifically as it is about what was going on at the time and why the clocks were evolving and improving. The fact that they were not evolving as fast as they could have done because of the demarcation and guild system is also just as fascinating if somewhat eye rolling.

The reason this clock got the treatment was fundamentally the same as every other clock we do the same for. Its a bit of a “thing” with brass faces generally. I think that an aged and corroded clock face tends to give the impression of some sort of basic nature to the machine – a simple and perhaps mechanically clumsy look. When you resilver the face, refill the engraving and get the brass and guilding back as far as you can, the clock takes on a different persona. It looks every part the scientific instrument it should do. It was presented at its first sale as an example of the finest engraving and materials technology to encase mechanical alchemy.

These clocks, specially during the really early period 1660-1740 were about as understandable to the indigenous population, in terms of their workings, as a robot butler or home matter transporter would be to us. You needed a church to tell the time normally. So the function of the clock was really where the value lay. Decoration was traditional and in line with furniture styles of the time. Later on it was done to a price and the market developed naturally to its various levels with London maintaining top dog influential status for what was hot styistically, which was what was hot about 100 years ago. They made village planning permission committees look like dynamic agents of change.

Face design was based on a guild defined set of design directives and proportions. So what we see today – these striking commanding status symbols, is not what the first eyes who saw the clock saw. They saw an incredible machine with a readout on the front that created the time from moving metal.

So, having bigged up the importance of the face it is of course really just a frame for what this clock meant when it was made – accuracy and fine engineering; arguably the most important and influential science of the time. The period in question is pretty much 1690 to 1800 for most of these well made brass faces in the London style.

I think this clock might be towards the end of that period as the innovations are quite “out there” in clock terms where moving a spandrel 2 inches might be considered heresy. These deviations from the conservative norm happened later in overall production history and were more common the further away from London the clock was produced.

You may think I am, uncharacteristically, exaggerating the importance of the tech within and what goes into that with some of these clocks. Surely after all, a clock is a clock and accuracy is important but the true value of the clock at the time of its production would have been in the finish and that it told the time. Given that all grandfather clocks are pretty accurate simply because they have a long pendulum (its 90% of the solution), surely the emphasis of a good clock is likely to be looks rather than any extension to the engineering.

Well your wrong! (or right depending on what you thought). Look at this beautiful piece of innovation. This is actually a bit too good for an early clock. One clockmaker is unlikely to have come up with all the innovations here and some are clearly borrowed from other genres of clock. A couple of things on it such as the way it lifts its second hammer on the hour so that it single strikes out the hour and double strikes out the quarters….thats very clever I have to say and I wish I could show it here but its a bit too much.

20190517_125958

Im not sure how much detail this picture will show in terms of zoom but if you can zoom in have a good look; Ive posted it at maximum resolution. What you can see there is a quarter chiming two bell grandfather clock running off the most complex and challenging countwheels I have had the good fortune to take to bits. I’ve worked on 8 bell clocks but, actually, this is more inventive and mixes the mechanical features from a couple of other clock types.

The countwheel was used a reasonable amount on British clocks but we favoured a different (and the now prevalent) stepped cam on the canon pinion. Countwheels were popular in the USA where they seem to be used exclusively, and in Europe where you often see them used on slate mantle and boule bob pendulum clocks. What is totally uncommon (Ive never seen one) on a countwheel system is to attempt a quarter chime. I’ve seen internally and externally mounted countwheels but nothing with this level of segregation.

The system is arguably not fit for purpose as it is so vulnerable to wear but it works brilliantly with the only difficulty being setting the zero point on the countwheel and consequently then checking and entire 12 hour sequence of chimes for each attempt. I wasn’t prepared to believe that the hand cutting could be so consitent that there was not going to be an error tollerance that might creep out on a full run; so I had to do one every time to be sure. I did find the sweet spot after a few attempts by working from the mid-point of the trench outwards on each adjustment.

The problem from a technical perspective is that the system works like a punch card. Each time the clock strikes an arm taps down on the countwheel which is always rotating while the clock is chiming. When this arm comes down it hits either the edge of the countwheel or goes into one of the carved out square trenches. If it falls into a trench then this extra distance the arm travels is enough for it to lower a lever connected to it into a blocking position for the chime mechanism as a whole. The chime system locks and the arm is set in the trench ready to be lifted into action on the next quarter hour.

20190426_124402

So, tap the lever on the countwheel edge and the clock keeps going, and drop the lever into the countwheel trench and the chiming stops. Thats essentially the key process.

[As an aside, this also means on this particular type of clock you can advance the chime without moving the hands just by sticking your hand round the back of the movement and lifting the lever out of its countwheel trench. If the clock is out of sync e.g. it reads 10 o clock but strikes 11 times then its probably been jogged and the lever has jumped out of its trench and carried on until it hits the 12 o clock trench. To correct this just keep on lifting the lever until the chime catches up with what it says on the face. If you do this, firstly advance the minute hand to 5 past the hour to avoid the lift cam on the front of the face clashing with your movement of the lever at the back.]

So the countwheel is a thing of wonder and true engineering prowess considering it was all done with hand tools. For me at least, there is another impressive factor in all this which I was educated in when setting up the countwheels “zero degree point”. If you work out how many chimes happen in 12 hours you will come to the figure of 468 including quarter chimes. That therefore has to be your graduation round the wheel. A convenient 0.7692307692307692 degrees. I mean at least its and exact number.

To understand how a countwheel sequences have a look at the the wheel in the picture. You will notice the same trench pattern repeating on the edge, but separated by a larger degree arc of edge on each repetition. What you are seeing are the stop trenches for the first 3 quarters followed by the main sequence of flat rim that continues until the wheel turns and the next trench is reached. This means that the wheel has to be cut to an accuracy of less than a degree absolutely consistently. Any deviation at any point will throw the entire sequence out as the chime system is absolutely linear.

I work with brass a lot and problems like this are a horror. You cant correct it if you get it wrong and brass is like butter once you get the hang of things with a good file and some other fun tools. When you look at the wheel it does look complex but it much worse than it looks!. When you consider each of those gaps is a minimum of two chimes and the brass on the lever is 1mm you realise how tight things are.

You cant make any mistakes in calculation or execution when fabricating this item. Yes there are jigs and suchlike that are used but even then its literally a single stroke to many with your abrasive of choice and its game over and probably a guild flogging followed by excommunication. Working with this clock has made me respect the chap who made it, its as simple as that.

“Excellent, so just mark out 3 of those 468/360th wide segments on an arc accounting for the lever edge presentation arc from its spiggot, lever thickness, and dead straight connecting edges. Oh and dont forget you are fired fired fired into the gutter if you get it wrong.”

Apart from the challenges in production there is also the general standard of engineering required to keep an instrument with moving parts tight enough to maintain this very rigid tolerance in the countwheel. There is a secondary gear that connects the main barrel arbour with the countwheel gear so the countwheel is driven as directly as possible from the power source. This makes sense as any wear on the teeth will result in the countwheel setting further and further back from is synchronised stop/start position accurate to that rediculous fraction of a degree I quoted earlier. The less teeth and cogs in the gear train the less chance there is of play developing and there being “pick up” in the gearing before power is transferred.

It was a very interesting refurb and a pleasure to get to know this particular adaption. The face really took the restoration process well and came out spectacularly well when compared to its prior state. Marvleous!.

20190426_124338

20190517_130040