This is the inside line on how to move a grandfather clock with lots of good clear advice and a step based tutorial approach. I do this from time to time to……keep clocks going and keep people involved with their clocks. Moving your own grandfather clock gets you into the clock a bit more. You will see some of how it works and it might even lead to you attempting some of your own service jobs – a bit like owning a classic car. This article tells you how to move your clock safely and professionally. Thanks for visiting my site and taking and interest.
If you clock is worth a great deal you should probably get somebody like me to move it. Its an odd thing to open with in terms of a DIY tutorial but the process does have some risk, which while I tell you exactly how to avoid, is still present.
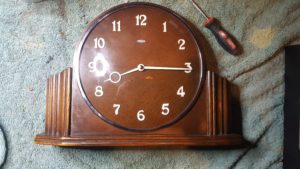
If your clock is a mid-range two weight affair (and very nice too!) then you can move it yourself because it comes apart easily and fairly robust. Its the more expensive clocks that tend to have the more fragile key components. Grandfather clocks are almost modular in design and tradition of manufacture has meant this modularity is consistent through grandfather clocks manufcaturing history. This is partialy because all the parts were manufactured by guilds specilising in each area. Cases were produced and sold to clock movement makers who in turn were buying face plates and dials from engravers and sheet metal producers. This even applies to the face components like spandrels and hands, but dont worry, you wont be removing those. In fact there are only five elements to the breakdown for transport. Head, case, movement and face assembly, weights and pendulum (and key!)
So this is a step by step guide on moving a 1700 – 1860 clock. Broadly speaking they share identical overall construction.
Before you do anything to the clock record the angle of the clock on two horizonal axis. You are going to need to set the clock up at exactly the same lean and yaw as it is currently set to or it wont work when you put it in place at the new location.
So, you need to measure the lean and yaw from the hood of the clock .The hood is the box head of the clock with the glass door. It slides off as a separate assembly, but we will come to that, firstly you need to measure. To do this get two small spirit levels and a whiteboard marker. Put one on the side ledge of the clock hood and the other on the front ledge. Mark the edges of the spirit level bubbles and mark each level with its identity / side / front.
Remove the hood. What you are dealing with is a box with an open bottom, back and of course a glass door. It slides forward so just get a hold of each side with the flat of your hand and pull it forward. If the clock has not been taken apart for a few years you might need to lightly jiggle it. You will see some movement on the edges and you can than work that into a slide with a bit of perseverance. But stop…..
Before you do this secure the glass door catch because the clock head will likely lean forward in the last stages of sliding free. At this point the door, if not locked, will open and hit you directly in the face. The higher the clock the worse this is. I was working on a 1900 8 bell that was 7.5ft high the other day and if that had opened I would have been wearing the whole head door like a jagged glass necklace. So worth mentioning.
Ok so the hood is off. Now you remove the pendulum. Look behind the movement and see whats going on.
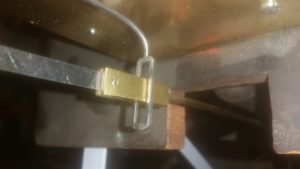
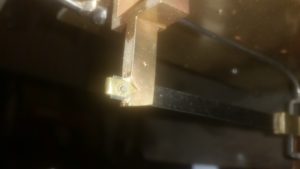
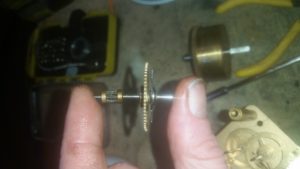
What you will see is the pendulum rod become a leaf suspension spring in its top 6″. At the top of this leaf spring, if you look carefully, you will see that the leaf spring is sitting suspended from a slit cut into a support. It isn’t slipping through because there is a brass stopper at the end of the leaf spring so the whole pendulum is hanging from this brass stopper.
The next thing you will notice at the bottom of the leaf spring is that there is a dog leg shaped wire protruding from the movement which appears to cross the leaf spring. This is usually at the junction between the pendulum rod and the brass block that joins the rod to the leaf spring. That dog leg is a lever that moves back and forth with the pedulum because it has a fork or loop in it that surrounds the brass block. You cant see this loop / fork arangement easily form a side view so you have to know what your looking for beforehand if its the first time youve had the head off. Rest assured what you are looking at is a leaf spring running through a fork or loop attached to a dog leg lever that leads into the clock movement.
To remove the pendulum you need to reach inside the clock and get a grip on the pendulum rod as far up as is comfortable. It must be comfortable because you may need to support the pendulum for a few minutes and a tricky job is badly effected by discomfort. If this bit goes wrong it starts to cost money. Dont unscrew the pendulum weight off to make things easier. It needs to be exactly where it is for the clock to keep the same level of accuracy as it currently does. If you replace the pendulum weight even a few MM down the thread when you reassemble it the clock will gain or loose time significantly and need regulation which is a time consuming week long process of change, measure, change, measure etc. to find the precise bob position that results in perfect time. Grandfather clocks are designed and valued for their accuracy so messing up the timing on one is a cardinal sin! Certainly to the owner.
You should be looking directly into the back of the clock so you can see the leaf spring, its brass block, and the crutch (dog leg wire), while at the same time holding the pendulum rod as described.
Lift the pendulum slowly. The stopper at the top of the spring should lift but if its sticky the spring will flex to account for your lift. If you bend the spring to much its had it, so take it easy on the lift and – 1cm should shift it. If it doesnt get your spare hand on the stopper and pull it up while SUPPORTING but NOT PUSHING UP the pendulum with your other hand. If you push and pull at the same time you can snap the crutch / fork join.
If, as I hope, the spring comes free without event, then get your free hand on the stopper and push it back to release the spring from it slit. Once thats free of the slit then slowly lower the rod, BUT….
This is the tricky bit. The crutch or loop round the block is a tight fit and the blocks are square. If lifting the pendulum to detach the leaf spring from the slit has pushed the brass block right up through the crutch then it can be really trick to pull it back through because the fit can be very tight.
This is why I recommended a comfortable position which you should test with a measure of how heavy the pendulum is before you go for it. You cant hurry this bit or force it because the crutch is and expensive component to get fitted and the join on the dog leg is often 100 years or more old. The crutch will break easily under any kind of strong force. Its about as fragile as plastic to give you an idea. If its a bad one then soft plastic thats already perished is the norm – an accident waiting to happen.
Im not saying your clumsy, the fact of the matter is that you will be supporting a kilo or two on a thin rod in a stress position which encourages you to hurry. If you loose your grip on the often thin an smooth pendulum rod and it drops, then the block will catch on the fork and the weight of the pendulum accelerating downwards will break the crutch at the solder point.
You will either be fine or swearing a lot or probably both about halfway through.
Once you’ve done the pendulum wind the weights right up. When I say right up I mean until you feel the very first hint of extra resistance caused by the weights locking at the top. Go really slow at the end of the wind to find this sweet spot.
Now take the weights off. Wrap both in a single towel and tape it. If you wrap them individually they roll and bang into things unless you pack them in packing in a box. If you bubble wrap and tape them they invariably break loose and you have the same problem. Towel.
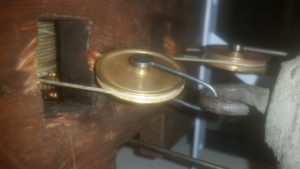
If you look up into the clock you will see the weight wheels bunched up against the supporting plank. Wrap a few layers of packing tape loosely around them to maintain their position. You want to be able to easily cut off the tape at the other end so that the wheels are sitting there with the cable in their grooves ready for the weights. Don’t worry if the cable falls out of the grooves during transit too much and better lightly tape them and have them come lose than fight a tape ball in low light near easily cut weight cable. If they do fall out, because you wound them to the sweet spot you can just sort of clip the wheels back to the cable – its not hard. If you overwind it however you will have no end of trouble so go light on the initial wind up and try and wind the wheels so they are just lightly clamped against the board by the wound in cable.
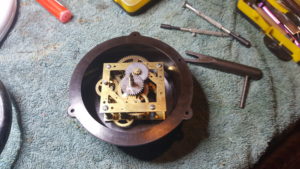
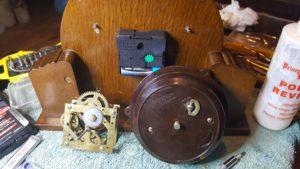
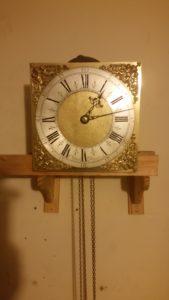
Your now ready to remove the movement assembly. The face is attached to the movement by three pins. That in turn is attached to the wooden base plate via two bolts. If you look up into the clock you will see these. The face, the movement, and the board are therefore a discreet unit for transport. You will be able to lift it off as such. Dont do this until you have read the rest of this article by the way – guaranteed fail if you do.
If you cant lift it off then its screwed or nailed on where the board meets the side support it sits on. For some reason there are normally four screws or nails, I suppose because this creates the best flat and even connection between parallel supports without risk of distortion. Anyway, remove the screws or in the case of nails lever the board up with a chisel so the nails detach. Do not use a hammer fork or nail remover from the top of the board. A 2″ chisel used judiciously is the path of least destruction. Expect some damage here and if you’ve got a brass face 1700 london clock in walnut phone Pickfords or me at this point. Move the whole clock rather than damage a rare and good one. Condition is everything at the top of the market.
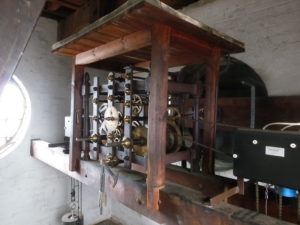
The movement assembly is the the riskiest part to transport. Pay attention to the back and the front specially. While it looks like the sides are vulnerable with the exposed cogs, its actually the hands face and the fragile crutch at the back that are going to get you if anything does.
The movement assembly is unstable by nature. Its just the wrong shape and will fall forward or backwards if you put it down on a flat surface or lean it up against a wall – it has a deceptive centre of gravity. Even if yours seems to be fine at about 25 degress off vertical I guarantee you it will topple easily backwards and that invariably snaps the crutch at its weak point. It will happen if you trust your luck when you need at third hand. Its one of the reasons l come well prepared or with my son if we need to collect, deliver or install a whole clock
The highest risk period of this whole job is from the moment you lift the movement assembly to the point where it is placed in prepared packaging. If you digress from the direct transfer from clock to packaging it all goes pear shaped quickly. You will place or rest the movement for a moment while making final adjustments to the packaging and it will fall over guaranteed and bend the hands or break the crutch. If your really unlucky you will scratch the face which on a brass faced clock is not something you can really come back from. Ive scratched a white face on one and only occasion. The restoration was 30 hours because its like filling in an oil painting as opposed to painting a surface with defined lines due to the variance in ageing coloration. I think I’ve probably made my point – get it off the case and in the box directly.
“The box” should be big and full of polystyrene worms ready to place the clock head in upright as if it were mounted on the clock.
DONT use bubble wrap or towelling or anything fibrous or snaggy to surround the clock in its box. This is because the hands on these clocks are pretty much like fishing hooks and will adhere to any of the aforementioned. Before you know it youve bent or snapped a hand off while removing the packaging. Its a really common mistake to make. Equally the crutch at the back is perfectly designed to snag on packaging and actualy moves around as well so its almost willing itself to snag up on something.
Fundamentally, its worth the hassle of getting the right packaging materials for this bit and while it will mean pulling poly worms out of the movement at the other end its better than a key component break. Don’t use beads – it has to be worms. Beads, the small ones, will get in the clock and you will be spending some time locating and removing the ones that fit perfectly wedged between overlapping cogs and are a swine to get out. I know because some people use them when then send clocks to me for repair. Somebody did it with a cuckoo clock once which I shall not forget.
In terms of the pendulum, make a two piece cardboard sleeve from cardboard and tape it around the leaf spring. Now heavy tape it inside the case. Its easy to do if you lay the clock on its back. If the clocks only going down the road then just take it along but if its part of a big move where its going to be stored prior to installation the pendulum tends to be the problem part to go missing. Weights can be replaced but pendulums are weighted to individual clock to a degree although many are about the same. Theres no reference material available publicly that will tell you the weight range of yours and Id decline sourcing one if asked as it would be a matter of trying a few quite frankly – over to you!. Some would be easier than others but its not worth the risk of losing it.
So everything is now good to go and can be transported in the same way as, a television – with care. You cant shock it but it can be handled in pedestrian fashion providing of course you take due care with the head which has particularly fragile glass. If its original beautiful uneven glass with faults its a terrible shame to loose it so I would actually recommend boxing it up with bubble wrap like a vase.
The case is worth wrapping in a sheet. The case is awkwardly weighted when you carry it, solo specially so, and its easy to mis-judge it and catch the edge of a door frame on the slide as the case tries to turn in your grip with the uneven weight distribution. The uneven weight is mostly front and bottom heavy but only by about 60%. You will likely need to rotate the clock to get in through any awkward space and the clock can easily spin and slip during rotation even with two people. As long as you keep a firm grip and are aware of where the majority of the weight is at any given time, its ok.
When you reach your destination simply do things in reverse order and the clock should be standing infront of you almost ready to go. When you test you clocks position against your desired spirit level records it will almost certainly tick unevenly and stop after a short while. This is why it needs levelling to its native gradient.
In addition to the uneven, cantering tick the pendulum swing may well rub on the weights or the back of the clock if its tilted even slightly backwards. Correction is therefore invariably required even if its close to level and actually runs – it wont for long. But it might run badly and you will be tempted to leave it as that. This is a bad idea because what you dont want is a clock functioning but huffing and puffing along, if only for what it does in terms of uneven wear long term. If you leave it like that you might find it will ONLY run like that after a few years irrespective of adjusments you can make on crutch which is the only alternative adjustment. Basicly it knackers the clock over time and your giving it a death sentence.You might ace it and it goes in exactly right – 1 in 10 or so do perfectly but just be sure it really is right with a perfectly even tick tock and at least 5mm clearance from the pendulm back and front. If you dont give it a good 5mm any shifting of the surface its on over time eventually means the pendulum clashes with the weights. For instance carpet compresses flat over years for instance, and not evenly because of the front weight distribution of the clock. It leans forward over time which is a good reason to fix it to the wall towards the top of the clock. You can use glued wood spacers and screws on average clocks – a couple of holes / rawplugs is perfectly acceptable and all clocks mostly already have them. Its actually part of the character and shows you, in some cases, that the clock has had many lives.
We took some spirit levels measurements earlier that you now use to correct the difference. To do this is as simple as putting spacers under the corners of the clock to get the clock to the correct spirit level settings. You will need spacers on at least 3 corners in order for the clock to be stable. If you only do two corners and the spirit levels line up you will find that the clock rocks a little diagonally which is no good long term even if it appear to sit reliably perched on three corners. Just make sure its solidly planted as well as lined up with the levels.
In terms of what you use for the foot spacers, do not use box cardboard despite the fact you will have plenty about at this point. It compresses over time and the clock will go leaning tower of Pizza. This goes for any compressible material like that e.g. carpet shards to match the floor are a particularly poor forming choice but amazingly popular for some reason in my experience (I end up troubleshooting a lot of botched well intentioned moves).
Good materials are wood and paper but the best is probably game or business cards or thick paper or some sort. This can be divided up very accurately and cut to shape so they can be hidden away from view. It doesnt compress significantly which is what you are looking for in whatever you select as spacer material and of course its very easy to get the exact height you want. Variance is rarely more than 5mm on any foot as the cases are produced well and fit for purpose, they feature a good four point connect on a perfectly flat surface. I expect it was part of the art of producing the cases.
When most older grandfather clocks (130 years) were produced there were guild controlled method based apprenticeships which seems to have standardised both the basic design of the cases and the key quality points. I expect some things you were obliged to get right at the required standard!. A level base was I imagine probably one of these. Its certainly borne out in the clocks I have seen across all quality levels, but to be fair there are not many non-guild bad ones about and you might have one of those so it might be off…but its probably bang on so 5mm is where you should be aiming for on a reasonably even surface.
Note that there there are two legged variants that rely on tight wall fixing and have the advantage of often recessing into skirting board due to the lack of back pediment. If you dont screw this type on it will slip forward at the bottom very easily, scratch the wall, and break its glass as it grand slams on its back on the floor. Ive only imagined it by the way, thank goodness. But it is what would happen for certain because of the top heavy nature of the clocks.
Overall, to be fair, this method of propping the clock level is a bit bodge. The crutch angle at the back should be set instead, BUT, if I tell you how to do that you will only break it as it invloves bending it with measured force in the right location and understanding whats going on in the clock. This guide is for everyone so its a one size fit all!.
Oh – I almost forgot – get the winder and tape it inside the case with the pendulum.
So thats it. Keep on clocking and dont be afraid to give this a go. Ive stressed the risks so that you get it right, not to put you off. If you do what I have said you will be more than fine and a few hundred quid richer on re-location fees. Good luck and if you have any questions I can usually find time for a brief reply on email.
Some people are unable to, or don’t want to personally move their clocks for good reason. If you would prefer me to handle moving your Grandfather clock email me a picture and details of location, destination, time frames and Ill get back to you with an estimate.


 Now to be fair the speed regulator pin is missing so its not perfect but there was no way of really securing anything of that sort without drilling a fixing hole.
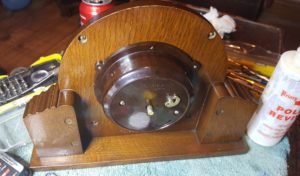 A big shout out to Paul at Polishes for making astonishing “polish reviver”. I dont do product ads or advertise on this site other than trade partnerships. I am the repairer for www.cuckoocollections.co.uk for instance and I manage an antiques centre which I often mention if theres something interesting to reference on the clock front. As far as going on about this reviver, its simply that this is good stuff and I like to see small specialists flourish when they deserve to. Its hard to find good people.
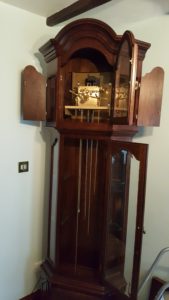
Recent Comments