What a worn spring looks like

This post is really just for those interested in what “a worn spring” means.

When a spring is wound it is peeled from the outer or the barrel onto the winding spiggot. Over time the spring loses its elasticity and starts to take on the shape of the spiggot as opposed to the outer barrel. This is a complicated clock repair because it takes some time to dissassemble the movement, remove the barrel and then extract the spring. A new spring must then be wound to a lower diameter, inserted into the barrel and then released to a snug fit inside.

The picture below shows the extracted spring and the new spring. You can seet the difference!.

20160917_181232


What to do when a clock spring repair goes wrong

The job

Sometimes things dont go as planned. In these instances its necessary to weigh up the options and get on with it.

I have been asked to repair a rather nice 1930’s regulator. The problem was manifesting itself as slow laboured chiming and illogical chime sequences. This is typical of a chime spring having degraded and lost its power over time. Chimes get halfway through and then just stop, only to restart as the beginning of the next chime sequence. It sounds as if the clock has lost its mind!.

At any rate the solution was a spring replacement which was measured and ordered. The owner of the clock decided to replace both the drive and the chime spring at the same time on my advice. Generally speaking, when one goes the other is not far off. Chime springs are usually the last to go as over time they get used less as people elect to turn the chime off.

This clock uses surpisingly strong springs. Spring strenth is rated on the springs thickness which ranges from .1mm through to about .7mm for most clocks. The spring is attached to the inside of the barrel by a metal pin drilled in and sealed as a rivet from the outside.

The unexpected problem

When I installed the new spring the pressure of the spring sheared off this pin and the spring would not hold firm in the barrel and slipped when tightened.

There were two approaches available here and thats important to mention. If you run accross a problem on a clock that you had not expected it really is important to just stop and consider the options rather than rush towards the first obvious method or fix.

Firstly I could source a new barrel but this would take time and its relative wear could cause unpredictable results. The other things of course is that you might be able to get the same guage of barrel but you would be very lucky if the style and colour were identical – new barrels are obvious visually.

The second approach was to use a spring attachement method I have seen on other barrels which invloves folding a tongue of the barrel inside to catch the loop on the end of the spring. This approach guaranteed a fix but also meant getting it right first time because if I underestimated the strength of the components the barrel or spring would split. So, to spread the load a bit at the join I created as wider V as I dared and then enlarged the hole loop in the end of the spring by 30%. The result was a strong effective repair. It looks a little brutal however it definitely wont slip or shear and the combination of a hardened steel spring edge on soft brass can produce spectacular breaks.

Ill now polish the barrel marks out and re-assemble the clock.

The pic shows both the repaired barrel and its twin (although not a strict twin as I found it had a slightly different strength spring). You can see the original pin in the left barrel. Note that I cut the poing of my “V” to match the position of the pin. This would ensure it had the best chance of catching the spring loop. To stand the V section ready to catch the spring I inset it (hammered it in) to the barrel so it was proud by about 3 or 4mm. It has to stand that proud to catch a fast moving loop that sets in when you release the spring in the barrel.


barrel_pin_shear_clock

Could I have done this differently?

Well yes is the honest answer. I could have hammered the bent barell back into shape. I tried to do this but wasnt bold enough and when the new spring went in it only half caught on what remained of the pin and sheared it even further. Next time ill go straight for the method I have used here as this is really the way the manufacturer should have done it in the first place. The method of cutting a tongue into the barrel was used later on in clock manufacture which I had assumed was a cost cutting modifcation. Having had to deal with the problem myself I can confirm is the better way in all respects as well as saving money in production. I find the same sort of modifications on modern chinese movements which are produced very cheaply but unbelievably well in terms of the no frills design.

What an expensive clock looks like

Most of the clocks people ask me to repair or service value between £50 to about £400. The reason I get more of these is that they are more common and people come to me to get clocks fixed for largely sentimental reasons. I dont consider value when I take work on – its just about getting the clock working for the customer and making everyone happy. Nice and simple.

Every now and again I get an expensive clock to fix. Theres a lot of snobbery in clocks and value usually equates to the name or brand. Everyone who collects clocks wants named items and there is a defininte prestige hierarchy in makers of the various sorts, as there is in jewelllery or with silversmiths.

The picture set below this article shows a typical clock worth between £1000 – £1500. Key features are:

  1. The quality of the case and the materials used. Onyx in this case, on brass with gilt on some components.
  2. Cloisonné enamal work on the dial and pendulum. Some cloisonne work doesnt measure up to close inspection, you can see its been hurried. In this case the enameling is well executed with variations in shade on the petals and close attention to detial.
  3. The movement is precision engineered and looks fantastic, even without the face attached. Bearing in mind it chimes on the full and half hour there are a lot of mechanics in there but its made to look beautifully simple and uncluttered. The movement is exposed and is SUPPOSED to look good which of course it does.Its stamped on the back with the makers name.
  4. Its maker is known.

When I saw it I knew it was 1880 – 1900 just from the style of it really and guessed it was northern European. A bit of investigation at the back showed the makers mark L Marti with a helpful date or 1889 but infact this turned out to be a French maker as opposed to a German one as I had originally thought.

The thing that really sets this clock apart is the quality of the movement. Once you have seen a few of these you start to get to really understand why some clocks are worth more than others even though they all do the same thing pretty much the same way with pretty much the same accuracy.

The owner of this one showed me a valuation certificate of £800 which was about 30 years old. Now, the clock is, at a rough estimate, about £1200 to replace. People never seem to sell clocks they have owned for some time so what a clock is worth is a moot point for the most part – but people always like to know the age and value of items in my experience and I am happy to oblige.

20160921_201341

20160921_201411

20160921_201350

20160921_221437

Worn carriage clock repair & a tip for dating carriage clocks and pocket watches.

20160918_180255

Firstly thanks to Garry and his Mum. This is the second clock Ive fixed for them and I am sort of thanking them in advance for their permission to publish some stuff on the repairs (ehem!).

I dont get as many carriage clocks in as I would like – they are always amazing to work on but they are also reliable and looked after by thier owners so dont really require much maintenance.

Carriage clocks are all about precision. The components are visible through the glass so they are designed to be beautiful and elegant while maintaining that steampunk jules verne feeling. Awsome.

These are hard clocks to fix. Because everything is generally smaller on a carriage clock (to reduce friction) its incredibly easy to break components while removing or replacing them. A lot of carriage clocks mechanics have more to do with wristwatch design than mantle clock. Having said this, rather like a wrist watch, once the clock is back together is as solid as a rock. You can shake it, turn it upside down, and pretty much do anything short of playing football with it; it will still run. Its a carriage clock after all which means is desgined to function in transit or when placed on and uneven surface.

Repairing or servicing a carriage clock should therefore not be done to the beat of a drum or a deadline. You take your time and smell the roses a bit.

Todays job is an Irish mini carriage with an hour chime. Its by W Gibson of Belfast and dates from 1890 – 1899, probably 1895 – 6. The reason it can be accurately dated is that it has service marks on the base. These are on the inner base and are not visible without removing a cover plate.

Finding service secreted away on clocks with initails is an excellent way of dating them. If your at an auction its a handy thing to know. Auctions houses make mistakes all the time – even the good ones, and often undervalue or incorrectly identify clocks.

20160918_180353

You might find several service marks on the clock – mine has two. If there are several then the clock is probably 3 – 10 years younger than its first service date.

These marks are often visible on the innner case of the clock so always have a look for these if your thinking about buying one. Note that pawnbroker marks / dates are likely to be much later than the clock was made. These will normally 4-8 digit alpha numeric. So, if you see a six figure number next to the intials then dont assume its a date – if the numbers dont make a date then its a pawnbrokers mark and the clock may be much older than any accompanying “date”.

Garrys clock is very probably 1895-6 because the service interval is 3 or 4 years based on the dates inscribed i.e. 1899 first service and 1902 the second.

3 or 4 years might seem like a short service interval compared to the 7-10 years we think about today, however, you have to take into account that everyone smoked. Tobacco smoke is the one form of airborne particle that really gets into a clock and mixes with any oil to form a brown gunge. This stuff is like glue and accumulates in the spindle holes and cog teeth stopping the clock. Servicing regularly is the only option in those circumstances.

I had to look at this clock for a good hour before I even attempted to remove or diss-assemble it beyond the outer cage. The reported problem was inconsistend chiming. It would get to 10 and then just stop chiming further hours.

With the case removed it was possible to see the sythe dropping and then jamming at 10. It was as though the teeth at the bottom of the scythe were different in some invsible way from those at the top. I had a good look with my manifying goggles and indeed there was more / different wear on the lower teeth than the bottom.

On old clocks this makes perfect sense. Each time the clock chimes it engages these teeth up to say the 5th tooth for 5 o’clock and the sixth for six o’clock and so on and soforth. This of course means that the first tooth is used in every chime on every hour. The second tooth for 11 chimes per 12 hours, but not of course 1 o’clock.

In essence, the higher the tooth on the scythe, the less times it has been engaged in the clocks lifetime. The result is variable wear which results in failure at tooth 10 when the difference in wear is enough to interfere with the meshing of the lever that lifts it. This doesnt make exact sense because you would think the less well worn teeth at the top would engage normally, however, the pallet that pushes the teeth also suffers wear so its not egaging with the teeth in the way it did when it was produced. Its worn itself a comfortable groove on the lower teeth over the years so that all fits nicely, but when it comes to the less well worn teeth at the top it starts to struggle to smoothly engage them.

The solution was to adjust the whole sythes setting up a little to compensate. A bit of 12oo grit wet and dry to both the lever and the topmost teeth of the scythe also got rid of any micro-burrs on the edge of the teeth. This had been causing a laboured cycle on each chime and just didnt sound right.

In about 10 years it will need doing again – Im almost tempted to leave a note in there for the next clock repair person to save him an hour trying to figure out what the problem is!. Pehaps I will do that actually as it could be easily hidden in the same place at the other two service marks to which I will of course add my own.

The adjustments I made would have taken probably an hour or so had I know exactly what was wrong. Instead it took 3 hours simply because you really have to be careful and test things very thoroughly with finer clock movements. When your problems are not obviously visible, and a result of microscopic damage, its incredibly important to be forensic in approaching things.  Touch as little as possible in the diagnositics because if you find the clock works all of a sudden, and you dont know why, then its going to go wrong again and youve wasted your time. Its therefore 3 hours well spent. Heres the finished article which will now go on test for 24 hours.

20160918_202725

Seth Thomas USA Movement c1875 vs Perivale GB Movement c1950

american_clock_repair

I recently did a repair on this Seth Thomas movement. Its the best looking one Ive come accross and it opens up a few questions about what progress was made over 100 years or so. Firstly Ill itemise what I like about the ST Movement…

  • Has big cogs so they dont need to be cut as accurately and wear more efficiently.
  • Uses a lyre arrangement for the top and bottom plates to save materials and improve access for assembly and maintenance
  • Has loop end springs so that you dont need a spring barrel complicating things
  • Has a simple accessible escapement mechanism front mounted so you can see it and get to it if required
  • A fair amount of it is made by hand e.g. the levers controlling the chime sequence. Adjustments are manual and dont involve fixings – you just bend wires.
  • The escapement cog is held in place with a bent bracket – hilarious, its supposed to be an area where things are particularly accurate but the USA seemed to have ignored this and its fine.
  • Looks fantastic.

Ok all this is typical of an Amercan movement from Walsh or Ansonia or Thomas around 1850. I think this one is a little later at 1875 but lets say 100 years go by.

So lets compare this to the Perivale style movement of 1950. Its a very typical one of the period and Ive selected one with exactly the same chime features.

  • Its machine made for the most part
  • It uses probably the same amount of material
  • The cogs are smaller and so wear out of tollerance more quickly than the ST clock
  • The smaller cogs are particularly sensitive to dust and dirt. The forces at the end of the drive chain are very weak so a build up of obstacles such as pollen and airborne particles can stop the clock.
  • The springs are in barrells which serve little purpose other than to hinder access to them.
  • Its a nightmare to work on without taking it completely apart
  • Non removeable rivets are used on components preventing replacment when worn. Its designed with a finite lifetime in mind.
  • Its no oil painting

Overall its a win for simplicity and innovation on the part of the USA.

The Perivale is ok and in its defence is more compact, however, I know which one I would prefer in my wall or mantle clock.

Why I do restorations and not just repairs

Clocks can be fantastically expensive to restore so I simply dont charge for a lot of the time I spend on restorations. Typically a mantle clock from the 50’s, mid-range, pendulum, laminated sylised case, is about 30 hours work. The mechanics require a strip down, clean, and plate polished even if the clock is working because you cant have dirty movement in a clock you want to make “new”. Thats a good 7 hours as you really have to learn the clock to completely take it apart. All the mechanics work fundementally the same but the arrangement of components vary. Its incrediby easy to whizz through and dissassemble once you know the method, but if you havent just looked at it for an hour and seen exactly the way it works, then it will take twice as long to put back together. Its necessary to photo document the movement from every angle so that when you come accross a problem you can refer to the precise positioning of cams, levers and springs. I still do this even though I can now operate without a camera and sometimes the precaution is appropriate.

The case requires a completely different set of skills. Its all about colour and finish. I know a disturbing amount about varnish and how it behaves it different dilutions of thinner. Nobody can teach you, not even a video because it a very tactile and material dependent. Ive worked with exotic hard woods like Sequioa and Ebony, British staples like oak and walnut, as well as fruit woods and box wood!. Each one takes the finish differently and requires a slightly different method.

This is the other reason I do resotorations – its a nice change of pace to completely change to a different dicipline like finishing and polishing because you always make progress and learn something new.

The other thing that is essentail for a case restoration is a bit of oil painting. I use oils to cover blemishes or lost veneer because

  1. Its good for colour blending on the pallette where you want to be working with several closely related hues.
  2. You can mimic wood grain with different hues and a brush tips
  3. Oil paint (dried) will not change colour or hue when a clear gloss finish is applied with varnish.
  4. Oil paint is viscous enough to partially fill scrathes and dents.

Most clock veneer repairs via this method can only be spotted under close scrutiny and the trick is of course how well you are able to do this – im always improving.

Restorations are only undertaken by people with emotional motivations. Its never about money on either side really. Even with my unmetered approach its still expensive, or I regard it as so anyway; low hundreds.

What it adds up to is achieving something beyond providing a useful service to people – I get to make people genuinely happy which is very rewarding. I got this card today from Wally, my brothers father in law. His clock was in a bad way so it was either “get it running” or a complete refurbish. Guess which one I felt honour bound to provide. I enjoyed every minute of it.

Ironically I forgot to take a picture of the clock but here it ia halfway through the finishing!.

clock_restoration_1

wally


Crittall Windows Factory Clock Discovered – Fusee & Platform movement

This is bit of local interest so some of you may have seen this clock working at Crittall Windows in the 50’s. It was given to my friend by a chap called Eric Masters some 20 years ago. If dont know if Eric is still alive but a big shout out of thanks to him for carrying the flame on this clock for a while.

p2c

These local factory clocks are becoming valuable now. They hold memories for a lot of people and so demand is high when they become available. Quality varies but this clock is top end for the genre. A Courtaulds clock recently sold at Bocking Auctions for around £400 (2015). Compare this to the same clock without the factory connection and you could easily purchase an example for £50 – £100. The one above has solid provenance but it would have really helped it to have the factory name signwritten on the face as was the fashion at the time. You cant have everything I suppose and the bonus feature on the face is the second chronometer. Nice tick too.

This clock is fundementally awesome and works as well today as it did when it was being used (although it did need a service clean and complete tear down to component level). I work on a lot of different types of clock movement. Its unusual to do exactly the same movement more than once – there is a fantastic variety although they all incorporate various sets of features effecting accuracy and logevity. Its really interesting to see how these features are icorporated in various ways to deliver the best timekeeping for the environment and purpose of the clock.

The movement in question has two really nice fatures that make it ultra awsome, namely the fusee assembly and the platform escapement used in conjunction which is surprisingly uncommon. Firstly, the platform escapement.

p4c

Platform escapements are used in portable clocks because you cant use pendulums for obvious reasons. They are expensive to produce and cross the line into watchmaking engineering skills. Where appropriate pendulum regulation on clocks is the norm, platform escapements are only used where needed due to cost. The point about platform escapements is that they are reliable and accurate on a ship for instance, or in transit. Carriage clocks rely on them exclusively as their core time regulation component. They are also self contained and modular as you can see from the accompanying picture. This being the case, the rest of the clock components e.g. the spring, and the wheels, do not require the same production precision and will still add up to an accurate clock when assembled and set running.

That is, if the clock is fully wound of course…. which takes me to the subject of the next awsome feature – the fusee mechanism.

The point here is that while a carriage clock is accurate, the amount of time it runs for before it needs winding will vary with the age of the clock. Thats no good in a factory when the time the clock shows really counts for timesheet and production schedules.

The engineering problem is that a spring delivers more power the more tightly it is wound. You will have noticed that if you wind a stopped clock the key will turn easily at first and then tighten as you proceed to wind. This of course means the torque provided is higher when fully wound and fades as the spring unwinds.

Clocks are engineered to run on only the amount of power provided by a couple of key turns. This means that the clock will function from fully wound right through to a couple of winds short of untensioned. This all sounds fine until you factor in the weakening of the spring over time.

Despite the best efforts of the metalurgists and steel makers, spring steel has a lifetime. It gradually loses its rigidity through fatigue caused by weekly winding over many years. The other thing I have noticed is that I often get clocks that have not run for years but have been left fully wound for that time. The first thing people do when a clock stops due to mechanical failure is wind it right up to the hilt, followed by stowing it away for 20 years. In my experience this general wear translates as and 8 day clock only actually running for 6 or 7  days of its spring cycle once its about 50 – 100 years old.

To address this a fusee mechanism is employed on the Crittall clock. This is ingenious.

p5c

Rather than power the clock directly from the spring the fussee wheel acts as a variable ratio gearbox for the delivery of  consistent and adequate torque to the gearing. The real coup de gras on this is that with the clock fully expent the spring can be tensioned against the connecting chain. It means that even when the clock completely unwinds the spring is still under some tension and there is no “fade” in the delivery of power. Because the chain is a fixed length you get exactly the same amount of turns on the winder every time its wound. 8 days means 8 days with one of these.

p6c

Another quick point on this – ive not seen a covered platform escapment before as on this clock. Its a cap to dust cover for the flywheel and tiny spring. Smaller components in clocks are sensitive to dust build up and rememeber.. this was used in a factory, so again, another feature incorporated spefically for the clocks environment. I forgot to get a picture of this specifically but was lucky enough to snap most of it in another shot.

If I were looking for a wall clock and I had a choice of anything under £500 this would come close to the top of the list. Its functional accurate and reeks of confident competent design and engineering. The ultimate presitige kitchen clock!. This one isnt for sale but keep an eye out at Braintree and other auctions and you may well get lucky – Ive seen 3 in a year go under the hammer.

If anybody knows this clock please do get in touch. I would be more happy to publish and attribute any information as an addendum to this article. Email me at admin@braintreeclockrepairs.co.uk


Nazi U-boat bulkhead clock / marine clock


This was not a clock repair job – its a clock I came accross at a friends. Im no fan of the Nazis past or present but this is a little piece of history and quite facinating when you consider the context. This clock used to run in a u-boat. Its a particularly good example for a couple of reasons. Firstly there is no wear on the face. Normally you would see a line of wear around the number ring where years of time resets would leave a finger wear line. Secondly it is black on brass. The owner told me that most examples have / had been polished up to the brass uder the paint by bored sailors. The way it looks now is the way it would have looked in 1944 with no changes. The nazi logo features promiently and is rather ominous, however, from what I have seen of other items at auction the logo features heavily on nazi military objects, much more so tha allied forces equipment of the era. It reflects the abosolute and cultist nature of what nazis and their propaganda machine did at the time.

One of the reasons the clock has no wear on the face is that it wouldnt have needed adjusting that often as it wa, and still is, incredibly accurate. It would have been kept constantly wound on ship so it would only need ajusting when it edged out of time which would have been an infrequent occurence.

I didnt get time to take it apart, however, from my experience of other marine and bulkhead clocks I can predict movement will be beautifully engineered with the minimum of cogs and spindles. Its the same sort of design as a carriage clock and will be regulated by a platform escapement, almost certainly a swiss one, whith 6 jewells. The point about all this is that the design means that the clock can be moved or jarred without significantly altering is time keeping or stopping it. Important features in a carriage clock, wich as the name suggests, were designed towards portability. Napoleon being an early user of a carriage clock during his capaigns.

smiths_marine_movement

This picture shows the movement of a Smiths Marine clock from approximately the same era as the u-boat clock. They really were effective scientific instruments and were built and desigened as such. Time matters at sea, and at war, so there would have been no compromise on the quality of the time keeping.

The only other time keeping options would have been electric but electric movements of the era worked off mains power and relied on the standardised phase rate of the electricity supply. I expect they had a set of synchronised electric clocks with its own phase management on board. I say this because I have seen similar networked systems that were used in industry during the 60’s so I expect the military got there a few years earlier.

Common sense dictates that a backup mechanical clock would have been needed in the case of electrical supply failure and this is probably it. Mind you, I expect if your electricity runs out on a u-boat, what time it happened is probably the least of your worries.


How to Replace Grandfather Clock Cat Gut

This tells you exactly how to replace gut, how to go about it, what to avoid, the perfect finish and what gut to buy.

This first section of this article explains the difficult bit in replacing broken cat gut lines on a grandfather clock. Ive sort of started in the middle where the job gets interesting but I also cover the initial steps later on for those who are completely new to clock repairs and maintenance.

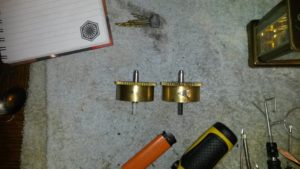
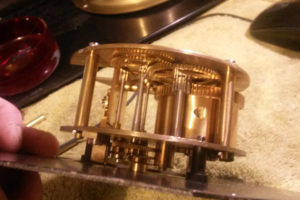
The pictures show the barrel removed from the clock for the sake of clarity. You will not need to remove the barrel, I just did so for you because the ratchet is hidden away somewhat when the barrel is in place and I wanted to show a clear view of the components.

So, you need to fit the new gut….

You will have to remove the old gut which invloves unwrapping what is left of it from the barrel.

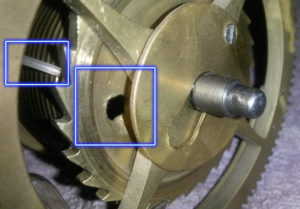
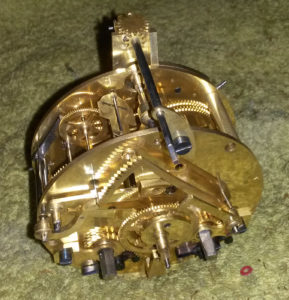
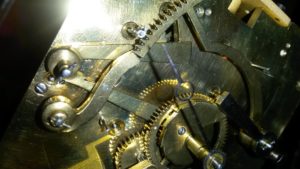
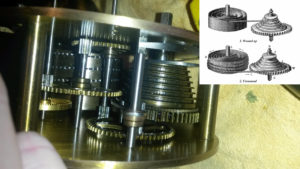
You need to get the barrel free wheeling so you can just peel off the gut by pulling it. To do this you need to find the ratchet which is on the curcumference mounted above the jagged edged ratchet wheel. It might not be in view so you need to rotate the barrel until you can see it. Do this with the key from the front of the clock while looking at the back of the clock for the ratchet to come round to where you can get at it.

As you can see from the picture you need to press this lever ratchet to release the cog to free wheel. Note that the ratchet is sprung with an arc spring. These can be surprisingly heavily sprung and quite hard to press in / release. Beware of using a screwdriver to push back the ratchet as you could stretch its retaining spring and disabling the essentail ratchet function until the spring is reshaped. Use the ratchet handle for this reason, even if its stiff or highly sprung.

Grandfather_Cat_Gut_Replace_Ratchet

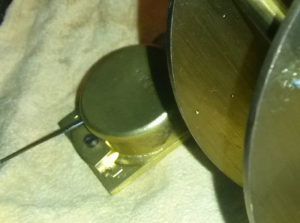
Once you have unwound the line then you need to detatch it from the barrel. Wiggle the gut a little and you will see it and its retaining knot moving inside the barrel through the hole – use a torch or clip on lamp to really help you see what you are doing as it is a fiddly job. You should be able to grip the line with the pliers and pull it out after a few attempts. Cut it and detatch.

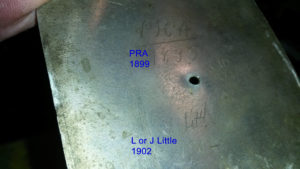
The picture below shows the barrel access hole corresponding to the line hole.


Grandfather_Cat_Gut_Replace

Grandfather_Cat_Gut_Replace_Barrel


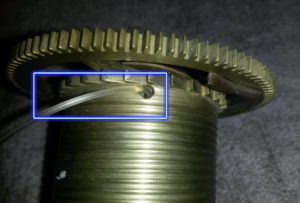
Now its time to attach the new gut. Once you have threaded the new gut into the barrel then extract the end through the access hole with the pliers as before. Tie a single knot – if you do a double it probably wont go through the access hole – the gut is too stiff. A single knot will become incredibly tight under pressure and will hold securely once you pull it back into the barrel.

The first time you wind the gut on the barrel, do it without the head of the clock on so you can see the exposed movement and ensure the line is flowing into the barrel grooves correctly.

Dont wind the gut back onto the barrel unless you have the movement back in the clock with the weight attached. This is important because if you try and do it by pulling the line with your hand to keep tension, it wont sink into the barrel grooves correctly. Its tempting to do this the first time as you will be keen to test your work while the movement is off the clock. The point is that if the gut is wound loosely it can tighten over and under itself when the weight is attached. Cutting it away and starting again after you have done 95% of the job can be the only option in these instances. In a nutshell, you need to reassemble the clock partially before winding the gut on.

People often ask me if they can or should use modern alternatives to cat gut. The answer is that its perfectly possible to use 60lb fishing line but its not as good for a couple of reasons. Firstly and most importantly it would be like roofing a thatched cottage with Tesco bags. Secondly the fishing line, and other synthetics come with too much “material memory”. In essence they dont take on the shape of the barrel over time as cut gut does. This means every time you take the weights off you risk a birds nest in the clock as the evil nylon instantly goes into a demonic tangle that will take you some time to sort out and possibly give you a heart attack. So dont do it if you value your life and sanity. I probably sound a litte raw from experience. The observant will have noticed that my pictures do actually feature nylon devil line – I am in in the process of replacing it and so its shortfalls are fresh in my mind.

If your taking the head and movement off the clock for the first time be careful. Disconnect the weights and take off the head to start (slide it forwards towards you and it detatches somewhat like an upside down drawer), then remove the pendulum. The main risk is forgetting to remove the pendulum before trying to lift off the movement.

The problem is that its generlly sitting back in the dark case and is easy to overlook unless you are working to a check list method. If you try to remove the movement with the pedulum attached then you may well break the leaf spring that it hangs from. This is a weak point in the whole assembly and easily snapped or creased. Its not the end of the world as modern replacements are available and in some cases you can get a contemporary part if you are fortunate.

Its still a job you dont need so check yourself and have a method and order of things to hand before you start. Proceedure is everything with clock repairs and maintentance, tick off the individual steps as you progress. This helps keep an organised and pleasant pace to things and removes uncertainty. It might seem like overdoing it but mistakes are frustrating and a relaxed pace is the best way. If you do it with a method you know youve done a good job properly. Heres my jotter list in bold for reference.

  • Remove head and store in a safe place. You will be looking up a lot of the time and its easy to put your foot through the nice big pane of glass at floor level if its within 6 feet of the clock on the floor. Replacing glass is expensive and surprisingly difficult on a grandfather clock because of the materials used to set it into the door. Its very hard to get older glass with its delicate imperfections so if your lucky enough to have original glass then take good care of it.
  • Remove weights. Grip the weights, not the gut when you do this. Holding the weights by the gut may seem easier but it will slip through your fingers unexpectedly causing friction burns or cuts. Its abrasive stuff compared to modern equivalents so a bit of respect is due when handling it with weights.
  • Remove the pendulum and place away from the clock. If you leave the pendulum in the case  it will probably get damaged should you drop the weights during the overall excercise. Fumbles happen because everything on a grandfather clock is a bit of a surprise in terms of forces and pressure points. The best thing is to protect against them rather than think it wont happen.
  • Cut the old gut where it attaches at the oppoiste end. This will normally be a peg / stopper type attachement and you can see more if you look into the movement and view the peg. Do this because you are going to replicate whatever you see when you re-assemble the clock.
  • Install the new gut
  • Replace the clock movement to the case
  • Thread the gut through the weight loop pulley wheels. This is easily forgotten and a pain to go back to after youve threaded the leading ends and tied the pegs!.
  • Fasten the leading end of the gut in the same way it was attached in the first place
  • Attach weights
  • Wind on the gut so the weights are raised
  • Fit the pendulum now the weight are raised providing the best possible access.
  • Fit the head on the clock
  • Pat self on back / light up cigar / look smug

Thats 12 steps over a 45 – 90 minute job so its worth doing a check list.

The pendulum is removed by lifting it off its hook at the rear of the movement and sliding it down through its loop on the escapement arm. Take a look at the back of the clock – the aformentioned escapement arm and pendulum are exposed components so its not to hard to work out how it all fits together and should come apart. When you disconnect the pendulum from its hook it might at first feel that the leaf spring connectors are too thick to fit down through the loop. Rest assured that it will definitely fit through because it was assembled that way; its just that the loop needs to be as thin as possible for the clock to run efficiently and connect with the arm that keeps in swinging with a little push on each stroke. It can be tricky and quite tiring on the arms – patience is key. Take a break every minute as your arms and fingers get tired which is often when the pendulum slips out of your hands heads towards your floor.

If it looks initailly that this might take some time its useful to have a friend hold the rod of the pendulum from the inside of the clock while you work on threading it at the top of the clock. This works well because you dont have the weight of the pendulum to deal with as well of the fiddly business of un-threading it through the loop on the escapement arm at the same time.

If your not tall enough to comfortably reach behind the top of the movement then get somebody who is to assist with this bit. Im not being “shortist”, its just that there is a certain element of risk. For instance, dont use a chair or you may end up on the floor under a clock that has fallen on you because you were gripping the top of the clock when you lost your balance. Losing your balance is easy when you are trying to twist about to get half your forearm into the clock.

Its also easy to fumble it / drop the pendulum – its a thin rod with a fair weight on the end and requires a firm grip from an awkward angle. If the pendulum drops it will stick a wooden floor tile like a spear. If on a hard floor it will bend or snap the adjustment screw on the base of the rod. Most grandfather clocks are more than 100 years old so if you look at yours you will almost certainly find it bent already and then bent back! – a message from the past perhaps.

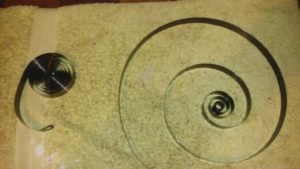
The cat gut itself is 1.4mm diameter for the vast majority of grandfather clocks. It can be bought easily online and prices range from £7 to £20 depending on quality. Make sure you buy enough and measure up beforehand rather than guesstimate. Measure with the gut completely unwound from the barrel of the intact side, pulled firmly straight to simulate its extension in the clock case. You can measure the length with the weight attached in the clock case but in the majority of instances the space is to restricted to use a tape measure accurately and you make a better job of it with the movement detatched on a table. A little more time and care spent here can make all the difference to the end result.

This is because the length is quite important. If its too long the gut double winds on the barrel when fully raised. This can lead to uneven wear and also means you weights will lie down on the floor when fully extended. As they lie down, or you wind them up, they will drag on the floor or clock base.

If on the other hand the gut is too short then it will require winding more frequently, but not significantly. So shorter rather than longer is best when guessing. You will essentailly be guessing even after you measure because however much you simulate weight pressure your probably going to pull up a little short of the true value; the weights are about 12kg each typically and the gut goes very straight under that sort of pressure.

Wether you need to do both sides when only one has failed is really down to wear. Take a good look at the intact side to see if there is significant fraying. Gut can go a bit “hairy” which is fine practically speaking, however, if you see fractured larger fibres that feel firm to the touch / scratchy then replace it. If in doubt replace it as you have the clock apart anyway and its easier the second time you do it.

Good luck with your clock. Email me if you need a hand or advice.

Justin


Redshaw Grandfather Clock Repair – Broken cat gut and dating the grandfather clock.

redshaw_grandfather_clock_fullThis post is mainly about dating a grandfather clock and Elvis.

I came accross this today. The weight cat gut had snapped which is a reasonably straight forward thing to fix and I will be publishing a guide on doing exactly that in my next post.

This Redshaw Newcastle clock is intersting for a few reasons. The most noteable is the round dial. It is actually a round dial as opposed to simply a round appeture over a square plate. Ive not seen this before, or convex glass on the head so I did a bit of research.

The maker is Redshaw of Newcastle. John Redshaw apprenticed with John Beech of newcastle in the early 18th century as far as I can work out. This conflicts datewise as the style of the face markings is firmly 1775-1805. It seems likely to me that this clock was produced by an apprentice or journeyman of Redshaws because he would have been getting on a bit when I believe this clock was made which I will come to once I have explained what evidence there is for an accurate appraisal of age.

The clock is original, everything about it is “right”. Ive seen other examples of Redshaws work and its very typical noth in terms of style and materials. As an aside to the date info here it migh interest you o know a very similar clock sold for £2150 in 2012 when values were low – thats a very good price for the buyer in hindsight. Clocks like this were selling for £10,000 ten years ago so even though the £2150 seems low its all comparative – this is a good clock with reasonable bragging rights!.

Dating this clock was more difficult than usual but the same rules applied to this as all the other clocks I see.

The first thing I noted was that the dial doesnt feature any of the legacy markings of the old one handed style clocks, such as markings for the half quarter hour; this means its likely to be 1740 onwards.

To further refine this identification I looked at other face features. The dotted markings for the minute hand refelcts the fashion of the period from 1775 to 1810. Another key feature that allows the clock to be placed is the sequencing of the arabic minute markers as 5, 10, 15 etc which was used until 1805 when it was replaced with 15, 30,  and 45.

A great way to put a grandfather clock within a date range is the face size / diameter. Dials increased in size from 1680 (10 inch) to 1860 (15 inch). This means you can often guess a grandfather clocks age within 15 years each way just by measuring the dial, although there were regional variations in this. An ancillary general rule is that at any given time dial sizes were 1 or 2 inches wider on Northern clocks for some reason. This applies to the clock case as well which increased in size over the 200 years of production with the north of the country being slightly bolder both in terms of size and deviation from the “standard” london design style led by London makers.

So at this point we know the clock is confirmed on three levels as a 1775 – 1810 item. Now, this clock is from Newcastle quite a way from London, however, if you look at it proportionally its not as big as one might expect from a clock from 1810, nor is it particularly grand or overblown. Its therefore less likely to have been produced later in the date range. The midpoint of 1775 – 1810 is 1790 so if we take off 10 years to balance the northern effect then the clock is likely to have been produced between 1780 and 1790.

Another hint on dating these clocks… look carefully at the roman numbers that are engraved into the dial. If the clock is original as opposed to a reproduction you will be able to see that the roman numerals have been hand engraved. This shows as a slightly bumpy inset relief on the numbers. Its where hand tools were used to gouge out the numbers into the brass plate. There SHOULD BE MISTAKES. This is important. Machines used in fakery or retro-styling of a modernish item dont make mistakes. If its perfect its not old unless its a really outstanding example from a top end maker which will be obvious anyway. Ive enlarged a picture of one of the numbers to show what I mean.

redshaw_grandfather_clock_engraving

The orange arrow shows where the engraver has had to change direction in the middle of a numeral. Its only a small error but it shows humanity in the production.

When this clock was produced the skills employed were high status. Computing and programming have a similar social status today as occupations. What is also worth considering is that the engraver would have been working on something quite valuable and it would have been a pressurised task to complete. If he had slipped with his chisel and marked the face it would have been a question of scrapping it and starting again.

I never ever swear when I do clocks because that would be wrong. This allows me to predict with some confidence that the engraver didnt swear extensively when he realised he was going in the wrong direction half way up the V.

Its this sort of human connection you get with old clocks that make them a joy to examine.

When buying a grandfather clock, consider that the case and the movement might not be an original pair. This significantly effects value simply because there are far more frankenstien grandfather clocks than there are originals. Its not really surprising as wooden cases rot and movements are engineered for longevity. The movements were always valuable and would simply never have been scrapped unless severely damaged or worn which generally speaking takes hundreds of years.

It can be quite hard to definitely identify an unmatched movement and case but heres what to look out for on a first look.

Is the plate on which the movement sits (a wooden platform that the movement bolts to) the same material, colour and condition as the rest of the clock interior facing panels?. If you can see newer cuts on the seating of this shelf it means its had to be modified to fit. That being the case its not the original movement in all likelyhood.

These items were high value when produced and all the wood would have been cut to fit perfectly and elegantly with room for adjustment where necessary, and tight fitting where it was not. When looking at this dont mistake modification for wear and tear. It might be that the shelf has worn the seating out a bit; after all, that shelf supports between 20 – 30kg of weight on narrow connection points. This means its common to see original parts that have been repaired and replaced in part, however, what you need to do it really look at it and say “can I see a factory fit in there somewhere”.

On this point,  many people believe (correctly) that clock makers bought in cases and case makers bought in movements. It was common sense to farm out the specialist jobs such as engraving to third parties and a surpirsing amount of components, such as the spandrels on the face, were bought in as prefabricated components from a set range common throughout the industry. The point here is that this tends to encourage people to believe that there will therefore be some innocent mis-match at the point of origin. This is a great way of convicing yourself that you are are going to buy an original as opposed to a frankenclock – a little knowledge is a dangerous thing.

To be clear, if a clock was sold by a maker, at the time is was bought the customer would most probably have been unable to tell. This means that you shouldnt be able to either.

If you clock movement looks badly engineered into its case then its probably a frankenclock. If you see one in a shop thats cheaper than it should be its also probably a frankenclock. Any retailer that sells you a grandfather clock is going to know the difference because of the difference in its value. A good frankenclock will cost about £1000 as of today (July 2016) and an original case and movement will cost £3000 for an item of the same approximate age and style. Dont expect the retailer to tell you if its a matched clock and case. Theres a reason for this beyond sales polotics. It is that people who know about clocks use the term “clock” to describe only the movement. This means if a dealer tells you its an original clock what he may be referring to is the clock movement and is not necessarily including the case in his implied description.

This is not subdefuge or dishonesty and happens because people who by grandfather clocks for the first time tend to give the impression that they know what they are talking about and so the conversation is conducted under certain assumptions about terminology. Or your being ripped off  and not told the whole story unless you ask specifically. It depends on how you look at it!.

I hope this encourages you to learn to date grandfather clocks. If you want further reading then I can recommend any book on grandfathers by Brian Loomes who is basicly a clock knowledge demi-god. I emailed him to ask a question, not really expecting a reply. He emailed back to tell me he was too busy to answer my email. I am blessed – I was told to go away by Brian Loomes which is about a high status as being able to say you were beaten up by Elvis. If you like clocks.

[Many thanks to D for letting me take the pics – cheers old bean]