Firstly thanks to Garry and his Mum. This is the second clock Ive fixed for them and I am sort of thanking them in advance for their permission to publish some stuff on the repairs (ehem!).
I dont get as many carriage clocks in as I would like – they are always amazing to work on but they are also reliable and looked after by thier owners so dont really require much maintenance.
Carriage clocks are all about precision. The components are visible through the glass so they are designed to be beautiful and elegant while maintaining that steampunk jules verne feeling. Awsome.
These are hard clocks to fix. Because everything is generally smaller on a carriage clock (to reduce friction) its incredibly easy to break components while removing or replacing them. A lot of carriage clocks mechanics have more to do with wristwatch design than mantle clock. Having said this, rather like a wrist watch, once the clock is back together is as solid as a rock. You can shake it, turn it upside down, and pretty much do anything short of playing football with it; it will still run. Its a carriage clock after all which means is desgined to function in transit or when placed on and uneven surface.
Repairing or servicing a carriage clock should therefore not be done to the beat of a drum or a deadline. You take your time and smell the roses a bit.
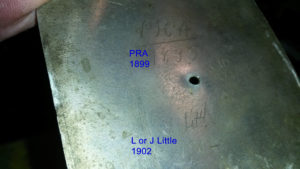
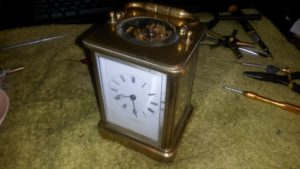
Todays job is an Irish mini carriage with an hour chime. Its by W Gibson of Belfast and dates from 1890 – 1899, probably 1895 – 6. The reason it can be accurately dated is that it has service marks on the base. These are on the inner base and are not visible without removing a cover plate.
Finding service secreted away on clocks with initails is an excellent way of dating them. If your at an auction its a handy thing to know. Auctions houses make mistakes all the time – even the good ones, and often undervalue or incorrectly identify clocks.

You might find several service marks on the clock – mine has two. If there are several then the clock is probably 3 – 10 years younger than its first service date.
These marks are often visible on the innner case of the clock so always have a look for these if your thinking about buying one. Note that pawnbroker marks / dates are likely to be much later than the clock was made. These will normally 4-8 digit alpha numeric. So, if you see a six figure number next to the intials then dont assume its a date – if the numbers dont make a date then its a pawnbrokers mark and the clock may be much older than any accompanying “date”.
Garrys clock is very probably 1895-6 because the service interval is 3 or 4 years based on the dates inscribed i.e. 1899 first service and 1902 the second.
3 or 4 years might seem like a short service interval compared to the 7-10 years we think about today, however, you have to take into account that everyone smoked. Tobacco smoke is the one form of airborne particle that really gets into a clock and mixes with any oil to form a brown gunge. This stuff is like glue and accumulates in the spindle holes and cog teeth stopping the clock. Servicing regularly is the only option in those circumstances.
I had to look at this clock for a good hour before I even attempted to remove or diss-assemble it beyond the outer cage. The reported problem was inconsistend chiming. It would get to 10 and then just stop chiming further hours.
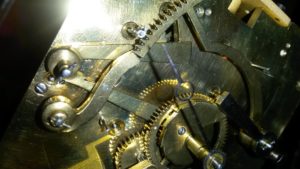
With the case removed it was possible to see the sythe dropping and then jamming at 10. It was as though the teeth at the bottom of the scythe were different in some invsible way from those at the top. I had a good look with my manifying goggles and indeed there was more / different wear on the lower teeth than the bottom.
On old clocks this makes perfect sense. Each time the clock chimes it engages these teeth up to say the 5th tooth for 5 o’clock and the sixth for six o’clock and so on and soforth. This of course means that the first tooth is used in every chime on every hour. The second tooth for 11 chimes per 12 hours, but not of course 1 o’clock.
In essence, the higher the tooth on the scythe, the less times it has been engaged in the clocks lifetime. The result is variable wear which results in failure at tooth 10 when the difference in wear is enough to interfere with the meshing of the lever that lifts it. This doesnt make exact sense because you would think the less well worn teeth at the top would engage normally, however, the pallet that pushes the teeth also suffers wear so its not egaging with the teeth in the way it did when it was produced. Its worn itself a comfortable groove on the lower teeth over the years so that all fits nicely, but when it comes to the less well worn teeth at the top it starts to struggle to smoothly engage them.
The solution was to adjust the whole sythes setting up a little to compensate. A bit of 12oo grit wet and dry to both the lever and the topmost teeth of the scythe also got rid of any micro-burrs on the edge of the teeth. This had been causing a laboured cycle on each chime and just didnt sound right.
In about 10 years it will need doing again – Im almost tempted to leave a note in there for the next clock repair person to save him an hour trying to figure out what the problem is!. Pehaps I will do that actually as it could be easily hidden in the same place at the other two service marks to which I will of course add my own.
The adjustments I made would have taken probably an hour or so had I know exactly what was wrong. Instead it took 3 hours simply because you really have to be careful and test things very thoroughly with finer clock movements. When your problems are not obviously visible, and a result of microscopic damage, its incredibly important to be forensic in approaching things. Touch as little as possible in the diagnositics because if you find the clock works all of a sudden, and you dont know why, then its going to go wrong again and youve wasted your time. Its therefore 3 hours well spent. Heres the finished article which will now go on test for 24 hours.


Recent Comments