This tells you exactly how to replace gut, how to go about it, what to avoid, the perfect finish and what gut to buy.
This first section of this article explains the difficult bit in replacing broken cat gut lines on a grandfather clock. Ive sort of started in the middle where the job gets interesting but I also cover the initial steps later on for those who are completely new to clock repairs and maintenance.
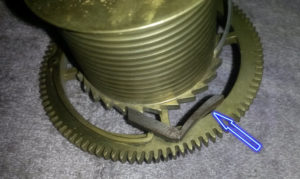
The pictures show the barrel removed from the clock for the sake of clarity. You will not need to remove the barrel, I just did so for you because the ratchet is hidden away somewhat when the barrel is in place and I wanted to show a clear view of the components.
So, you need to fit the new gut….
You will have to remove the old gut which invloves unwrapping what is left of it from the barrel.
You need to get the barrel free wheeling so you can just peel off the gut by pulling it. To do this you need to find the ratchet which is on the curcumference mounted above the jagged edged ratchet wheel. It might not be in view so you need to rotate the barrel until you can see it. Do this with the key from the front of the clock while looking at the back of the clock for the ratchet to come round to where you can get at it.
As you can see from the picture you need to press this lever ratchet to release the cog to free wheel. Note that the ratchet is sprung with an arc spring. These can be surprisingly heavily sprung and quite hard to press in / release. Beware of using a screwdriver to push back the ratchet as you could stretch its retaining spring and disabling the essentail ratchet function until the spring is reshaped. Use the ratchet handle for this reason, even if its stiff or highly sprung.

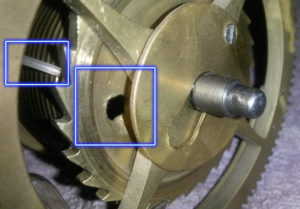
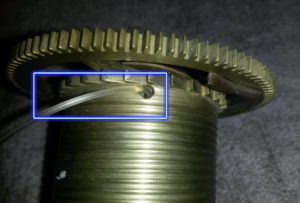
Once you have unwound the line then you need to detatch it from the barrel. Wiggle the gut a little and you will see it and its retaining knot moving inside the barrel through the hole – use a torch or clip on lamp to really help you see what you are doing as it is a fiddly job. You should be able to grip the line with the pliers and pull it out after a few attempts. Cut it and detatch.
The picture below shows the barrel access hole corresponding to the line hole.


Now its time to attach the new gut. Once you have threaded the new gut into the barrel then extract the end through the access hole with the pliers as before. Tie a single knot – if you do a double it probably wont go through the access hole – the gut is too stiff. A single knot will become incredibly tight under pressure and will hold securely once you pull it back into the barrel.
The first time you wind the gut on the barrel, do it without the head of the clock on so you can see the exposed movement and ensure the line is flowing into the barrel grooves correctly.
Dont wind the gut back onto the barrel unless you have the movement back in the clock with the weight attached. This is important because if you try and do it by pulling the line with your hand to keep tension, it wont sink into the barrel grooves correctly. Its tempting to do this the first time as you will be keen to test your work while the movement is off the clock. The point is that if the gut is wound loosely it can tighten over and under itself when the weight is attached. Cutting it away and starting again after you have done 95% of the job can be the only option in these instances. In a nutshell, you need to reassemble the clock partially before winding the gut on.
People often ask me if they can or should use modern alternatives to cat gut. The answer is that its perfectly possible to use 60lb fishing line but its not as good for a couple of reasons. Firstly and most importantly it would be like roofing a thatched cottage with Tesco bags. Secondly the fishing line, and other synthetics come with too much “material memory”. In essence they dont take on the shape of the barrel over time as cut gut does. This means every time you take the weights off you risk a birds nest in the clock as the evil nylon instantly goes into a demonic tangle that will take you some time to sort out and possibly give you a heart attack. So dont do it if you value your life and sanity. I probably sound a litte raw from experience. The observant will have noticed that my pictures do actually feature nylon devil line – I am in in the process of replacing it and so its shortfalls are fresh in my mind.
If your taking the head and movement off the clock for the first time be careful. Disconnect the weights and take off the head to start (slide it forwards towards you and it detatches somewhat like an upside down drawer), then remove the pendulum. The main risk is forgetting to remove the pendulum before trying to lift off the movement.
The problem is that its generlly sitting back in the dark case and is easy to overlook unless you are working to a check list method. If you try to remove the movement with the pedulum attached then you may well break the leaf spring that it hangs from. This is a weak point in the whole assembly and easily snapped or creased. Its not the end of the world as modern replacements are available and in some cases you can get a contemporary part if you are fortunate.
Its still a job you dont need so check yourself and have a method and order of things to hand before you start. Proceedure is everything with clock repairs and maintentance, tick off the individual steps as you progress. This helps keep an organised and pleasant pace to things and removes uncertainty. It might seem like overdoing it but mistakes are frustrating and a relaxed pace is the best way. If you do it with a method you know youve done a good job properly. Heres my jotter list in bold for reference.
- Remove head and store in a safe place. You will be looking up a lot of the time and its easy to put your foot through the nice big pane of glass at floor level if its within 6 feet of the clock on the floor. Replacing glass is expensive and surprisingly difficult on a grandfather clock because of the materials used to set it into the door. Its very hard to get older glass with its delicate imperfections so if your lucky enough to have original glass then take good care of it.
- Remove weights. Grip the weights, not the gut when you do this. Holding the weights by the gut may seem easier but it will slip through your fingers unexpectedly causing friction burns or cuts. Its abrasive stuff compared to modern equivalents so a bit of respect is due when handling it with weights.
- Remove the pendulum and place away from the clock. If you leave the pendulum in the case it will probably get damaged should you drop the weights during the overall excercise. Fumbles happen because everything on a grandfather clock is a bit of a surprise in terms of forces and pressure points. The best thing is to protect against them rather than think it wont happen.
- Cut the old gut where it attaches at the oppoiste end. This will normally be a peg / stopper type attachement and you can see more if you look into the movement and view the peg. Do this because you are going to replicate whatever you see when you re-assemble the clock.
- Install the new gut
- Replace the clock movement to the case
- Thread the gut through the weight loop pulley wheels. This is easily forgotten and a pain to go back to after youve threaded the leading ends and tied the pegs!.
- Fasten the leading end of the gut in the same way it was attached in the first place
- Attach weights
- Wind on the gut so the weights are raised
- Fit the pendulum now the weight are raised providing the best possible access.
- Fit the head on the clock
- Pat self on back / light up cigar / look smug
Thats 12 steps over a 45 – 90 minute job so its worth doing a check list.
The pendulum is removed by lifting it off its hook at the rear of the movement and sliding it down through its loop on the escapement arm. Take a look at the back of the clock – the aformentioned escapement arm and pendulum are exposed components so its not to hard to work out how it all fits together and should come apart. When you disconnect the pendulum from its hook it might at first feel that the leaf spring connectors are too thick to fit down through the loop. Rest assured that it will definitely fit through because it was assembled that way; its just that the loop needs to be as thin as possible for the clock to run efficiently and connect with the arm that keeps in swinging with a little push on each stroke. It can be tricky and quite tiring on the arms – patience is key. Take a break every minute as your arms and fingers get tired which is often when the pendulum slips out of your hands heads towards your floor.
If it looks initailly that this might take some time its useful to have a friend hold the rod of the pendulum from the inside of the clock while you work on threading it at the top of the clock. This works well because you dont have the weight of the pendulum to deal with as well of the fiddly business of un-threading it through the loop on the escapement arm at the same time.
If your not tall enough to comfortably reach behind the top of the movement then get somebody who is to assist with this bit. Im not being “shortist”, its just that there is a certain element of risk. For instance, dont use a chair or you may end up on the floor under a clock that has fallen on you because you were gripping the top of the clock when you lost your balance. Losing your balance is easy when you are trying to twist about to get half your forearm into the clock.
Its also easy to fumble it / drop the pendulum – its a thin rod with a fair weight on the end and requires a firm grip from an awkward angle. If the pendulum drops it will stick a wooden floor tile like a spear. If on a hard floor it will bend or snap the adjustment screw on the base of the rod. Most grandfather clocks are more than 100 years old so if you look at yours you will almost certainly find it bent already and then bent back! – a message from the past perhaps.
The cat gut itself is 1.4mm diameter for the vast majority of grandfather clocks. It can be bought easily online and prices range from £7 to £20 depending on quality. Make sure you buy enough and measure up beforehand rather than guesstimate. Measure with the gut completely unwound from the barrel of the intact side, pulled firmly straight to simulate its extension in the clock case. You can measure the length with the weight attached in the clock case but in the majority of instances the space is to restricted to use a tape measure accurately and you make a better job of it with the movement detatched on a table. A little more time and care spent here can make all the difference to the end result.
This is because the length is quite important. If its too long the gut double winds on the barrel when fully raised. This can lead to uneven wear and also means you weights will lie down on the floor when fully extended. As they lie down, or you wind them up, they will drag on the floor or clock base.
If on the other hand the gut is too short then it will require winding more frequently, but not significantly. So shorter rather than longer is best when guessing. You will essentailly be guessing even after you measure because however much you simulate weight pressure your probably going to pull up a little short of the true value; the weights are about 12kg each typically and the gut goes very straight under that sort of pressure.
Wether you need to do both sides when only one has failed is really down to wear. Take a good look at the intact side to see if there is significant fraying. Gut can go a bit “hairy” which is fine practically speaking, however, if you see fractured larger fibres that feel firm to the touch / scratchy then replace it. If in doubt replace it as you have the clock apart anyway and its easier the second time you do it.
Good luck with your clock. Email me if you need a hand or advice.
Justin

Recent Comments