The clock and its movement
Its not necessary to gain this knowledge for repairs although the best of luck if you are learning and I hope my general articles help. For the average reader or clock enthusiast this is not really the value of this article. It is that once you understand the basics of a movement and, later on, the various historical modifications, you are far better equiped to value and buy a clock for the right price. I have found it makes owning clocks more interesting and it gives a new level of focus in the pleasure of ownership. Its a bit like knowing your way around a car engine – if you do, you wonder how everyone else who does not manages to get by.
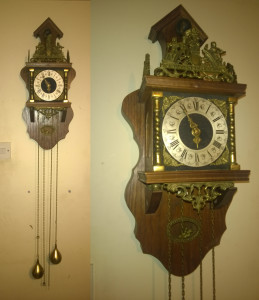
Before I talk about the repair I would like to talk about this good relatively modern classicly styled clock. This came to me in a box with the chains tangled and slipped inside. Once I got it back to the ranch and put it up I have to say its rather impressive and dramatic. Incidentally the pictures showing the movement later make the clock look small (the movement is small), but its quite large. Including the trailing chains probably 5ft with a 10″ wide head.
This one has a movement from probably about 1950 – 70 although it could be later. I have worked on many mechanically similar clocks and Ive come to respect them for what they are.
Complicated clocks with chains and chimes can be painful and expensive to own if they are old. Theres more to go wrong on them and they frequently slip thier chains if you knock them or the whole thing tumbles on the floor when the chains get snagged or pulled accidentally. For an old clock either scenario can means a long corrective process. Old clocks also seem to almost be designed to hamper access and require exhaustive dissasembly to access most of the areas where common problems centre upon.
The later clocks are the opposite. This one was relatively easy to untangle and was designed for simple maintenance access. I can just tell my looking at it that the clock will keep excellent time even if its off-beat, whereas older wall clocks can be stopped by a door slamming.
As you might be able to tell I am a fan of these relatively modern clocks and their bullet proof simply manufactured movements. I actually used a movement from one of these clocks when I built a sort of demonstratoin clock. It had the mechanics exposed around the chiming mechanism so I could show people what I was boring them about. Hours of fun.
What I really like about them apart from the ease of repair and reliablity is that they are still purely clockwork despite being manufactured in an age where a quartz movement costs pence and does a better job on paper. “No batteries required” and that has kudos. I say that even though even though at least a quarter of my clocks are vintage electrics which I also love.
Repairing the Chimes and a few other things along the way.
Note that all this really only applies to movement above 5″ square on the backplate. Other methods of construction and component space useage start to kick in below that.
In terms of this repair it was a case of fixing what had been done before as it were. I got the distinct impression I was not the first to attempt a repair on this clock. You can sort of tell after you have been repairing clocks for a while – the clock is not in working order and there is normally a spanner sticking out of the side, or its on fire – well to a trained eye thats what it looks like anyway.
Having assembled to start with I found that the chime was functioning on the half hour, but not on the hour. To do this I hung the weights, applied the hands and simply advanced them slowly listening for any levers or cams droping. If you hear a drop and the clock doest strike within a few minutes then you have a jammed lever or cam to take care of. It is indicative of problems on the front side of the top plate which is generally reserved for the various camms and levers that calculate how many hours to chime.
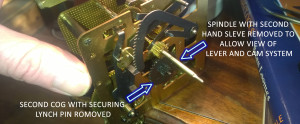
A good tip for investigations in this area is to remove the top second hand sleve so you can see what is pushing what.To do this you will have to remove its drive cog that is offset and meshes with it. Its the only other cog near it so you cant miss it. Normally its attached with a lynch pin or circlip. It almost looks possible to remove the second hand sleve without taking off the cog to the side – its isnt, and it never is, so dont try as you can damage or bend things.
BEWARE: If you warp a cog anywhere on a clock its game over so never lever them off with a screwdriver or suchlike (or anything). Always pull a cog from multiple grip points and be sure its actually supposed to come off by design. Also consider getting a mechanical pulling tool, it is less expensive, emotionally at least, than facing the acceptance of the fact you now own a box of assembed spares formerly called a clock.

Once you have the second hand sleeve out of the way its just a question of connecting the minute hand and advancing the clock so see how the camms and levers react to pushes from the central spindle cam.
You will have to do this with the left hand weight connected to provide power to the chiming mechanism. If you connect only the left weight its still possible to lift the movement and weight with one hand. This allows you to rotate and look at whats going on from different anlges which is esentail as you have to peer through gaps to see some of the mechanics function in their relay of operations. Ideally use a jigg – which can be two bricks as long as its solid.
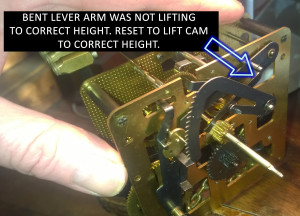
Take the time to slowly watch whats going on. Its all a perfectly logical sequences you can see mechanically playing out. It looks complicated at first but if you slow down it starts to make sense and the penny drops. It all comes together and you see what is going on overall and in detail. Once you have got to there its not hard to see the point at which things stop and why. With this this clock I did exactly that and it soon became apparent that the lever arm that sets off the hour chime was not pushing up far enough to release.
When you look at a problem like that its important to bear in mind that clock parts are always made to fit snugly together even where they have play in thier movement – any play or movement in componets is either controlled or calculated precisely within the design. Obviously you have to differenciate between this and “actual wear” but its possible to do that in most cases with a bit of experience.
That means if you find a component that is bent or out of place its highly likely this is prior human intevention of some sort – a screwdriver stuck in for a wiggle can really mess things up for instance. Things dont bend inside clocks on thier own – its a sealed unit for most of its existence and accidental damage is almost exclusively to the exterior.
In short, sometimes you have to physically bend components back into form and you should not be scared of doing so. This is of course providing you understand exactly what its going on in the mechanical sequence and the precise shortfall in the chain of events. When you first start reparing clocks its easy to pull your hair out looking at a design or mechanism only to find that you are trying to work out somebody elses mistake as opposed to the manufacturers intented configuration.
It really is essentail that you understand exactly what happens and in what order, so spend a lot of time simply viewing the thing working. All clocks work fundementally the same way but there are subtle differences everywhere that are more than likely something you need to know.
It does help of course to have done this before and I am not seriously recommending a beginner dive in and have a go but…… if you have a clock broken beyond repair, I highly recommend an autopsy in this area as once you understand the front of the clock, then the mechanics of the drive components are easier to understand.
This was a fast job to do becuase ive done a few of these but also because the clock was so well thought out in its general engineering design. Bearing in mind it was a strip down with a diagnosis, component correction and recalibration it shouldnt really have been a same day job but thats how it worked out. Marvelous.
Minute hand has come apart on my cuckoo clock
One more thing with these German Cuckoo or chunky handed clocks. Because your going to have to take the hands off to get to the rest of it you need to beware of the “Minute hand has come apart on my cuckoo clock” syndrome.
These rather rustically fashioned clock minute hand falls to bits so that the sleeve with the square recess for the spindle (which looks like a washer with a square centre) separates from the hand. This happens, in my experience, because wood glue alone is used in the join although ive seen the same problem on chunky metal hands too. Its odd for Germans to consitently engineer something badly so there may well be a reason. It could be that it was a clutch style fit between washer and hand to completely get rid of the aformentioned problem and make the join stiffly adjustable, but all the examples I have see have been loose fit and strong glue seems the best solution.
Anyway… this is not as simple as it first seems.
This needs to be glued together but it MUST be oriented properly – you cant just glue it in with the square in the centre in any old radial orientation – its got to be line up with the square on the spigot on the strike of the clocks hour. If you dont do this the clock will always annoyingly sound the full hour at seven minutes past, or some other incorrect value. The only way to put it right is to re-break\re-glue the hand or alternatively take the clock completely apart to the central spiggot and put it back in rotated 7 teeth reversed (or whatever the offset is).
To do this put the washer on the square spindle base and turn it slowly. When you hear the main sequence chime go you know that the clock thinks the minute hand is pointing straight to 12. Now you can glue the hand on the washer with superglue in the correct orientation.
BEWARE: However tempted you may be to glue the hand onto washer while its sitting nicely placed on the spindle DO NOT. If you get glue between the spindle and the second hand collar you could ruin the clock. Use the washer in place on the spindle, place the hand on it, and then pencil mark the positioning of each on the edges so you can take them off the clock, match them up and then glue them. The only reason I mention this is that it happened on this clock and has done so on every one of these clocks and cuckoo clocks, Ive worked on. What people do who lose the pieces I dont know – the wooden ones are handmade and I think it would be very hard to get an exact hand match to the second hand. That means two new hands and almost certainly in a different wood grain or shade. Keep hold of your hands.


Recent Comments