Alan Turing Vs Early American Clocksmiths. (Clocks win).

TuringClockJPG
This fantastic clock is probably a Walsh or Anosonia. Its better quality than most so probably walsh. Its a computer and I happen to know the movement type was patented in 1872. Alan Turing invented his machine in 1936 and was hailed as a genius. Us clock dudes had been doing it for ages we just didnt wave our bunsen burners around and start whooping like turing. Heres the bit from wiki about turings machine. My (Davids ehem!) clock does all these things. From Wiki…
 
The Turing machine was invented in 1936 by Alan Turing,[11][12] who called it an a-machine (automatic machine).[13] With this model Turing was able to answer two questions in the negative: (1) Does a machine exist that can determine whether any arbitrary machine on its tape is “circular” (e.g. freezes, or fails to continue its computational task); similarly, (2) does a machine exist that can determine whether any arbitrary machine on its tape ever prints a given symbol.[14] Thus by providing a mathematical description of a very simple device capable of arbitrary computations, he was able to prove properties of computation in general – and in particular, the uncomputability of the Hilbert Entscheidungsproblem (“decision problem”).[15]
 
The picture shows the clock using what is effectively a punch card system based on a cog with the “holes of the card” being extra deep cuts in the cog teeth spaces. These are spaced out at 1, 2, 3 etc teeth intervals.
 
The blue arrow shows the lever coming down and the lighter blue arrows show where it will stick as opposed to being read as “pass” or blank or whatever!.
 
As usual clocks are the answer to everything earlier than everything else.

Repairing and Electric Pendulum Wall Clock

Read this is your looking to repair an electric pendulum clock from the 80’s as it could save you a lot of frustration on ordering cock ups if you want to have a go yourself. But dont do that – get me to do it ;-).

Rather than reproduce the hints Ive just pasted an email I sent to a recent enquiry – its got all the info and you can see how I approach my jobs / customers at the same time!.

“Its likely to be a high tork electric pendulum movement. I did one today – a Seiko. Its a walk in the park to fit it providing you confident with getting the hands off the front. These might just pull off or there might be a screw or lynch pin holding them on. Remove the hands and replace the movement with an identical one and you are done. Finding an identical one is either easy or mindbendingly boring. Essentailly there are probably 5 movement types available globally on ebay. If you have one of those then its and easy job. If not you have to buy a donor clock – basicly find your clock or one using the same movement and then use that.

The things its easy to mess up if you are taking the DIY approach.

1. Spindle length. This is how far the nose of the movement stick out. If its not enough it wont clear the clock face and if its too much the nose hits the clock glass and stops the hands.

2. Hand appeture width. You have to vernier guage your hands inner holes and then order the right option with the movement. Its that or alternatively use the hands that come with the new movement. This isnt as bad as it sounds – most movements can be bought with a reasonable choice of hands. This link is the sort of thing you are after but I can advise on the exact item once you have sent a photo.

http://www.ebay.co.uk/itm/Takane-Westminster-Chime-Pendulum-Quartz-Battery-Movement-to-fit-a-5-8-Dial-/231909567469?hash=item35fee32bed:g:YK0AAOSw8RJXCrsP

If you dont want to go through what is mostly specification and ordering hassle then get me to do it. Cheers, Justin”

Packing and sending clocks to avoid transit damage – how to do it properly

When you send a wall or long case clock, or even a mantle clock there are a few rules to obey if you want the thing to turn up working when it is upacked. The most important thing is to unwind the clock. To to see how to do this follow this link. If you dont unwind the clock and the clock loosens up in transit from vibration or knocks then the lynch pins holding the plates together can fall out. The end result of this is probably easier to explain with a mataphor. Imagine you had a safety pin connecting the two sides of yoru rib cage togther. Releasiing it will result in the ejection of your inards. This, in the case of the clock, happens rather violently and often causes serious damage to the coggs themselves see below where the bar courousel has lost some of its spiggots.

I redrilled the holes in inserted new rods by the way – the clock is back to its excellent functioning self. The blue ring highlights the corousel and its stantion bars taken out for replacement. You cannot do this without a high precision thick drill and I was using a cobalt .3mm bit. If you mess up the positioning of the bars the whole clock will cease to function so do be careful if you are attempting this yourself.

Coggrepair

The other really important thing to do when transporting a clock is to remove the pendulum. Even if you cant see its fixing you can still lift it which should be enough to un-mount it from its hanging point. If you dont do this then two things will happen during transport.

  1. The clock will not function on a flat surface or vertial wall mount. The anchor escapement will need resetting befor you can hear it tick tock again,
  2. If the pendulum is loose it its case it will bounce around and possible damage the clock mechanism as well as almost certainly breaking the leaf spring its supposed to hang on.

If you have a clock you would like repaired thats come to you as a box of bits just give me a ring!.

Clock on people.

Justin

Oh – heres the clock it came out of. An absolute corker. American turn of the century with a movement that moved me!. Really nice one.Ansonia Clock Repair


Bespoke mainspring production

Making a main spring for a clock from scratch

When you need a new mainspring in a movement its normally possible to source a unit from a range of sizes and variations. There are a number of online retailers who supply enthusiasts and trade customers like me.

Every now and again you come accross a spring that cant be sourced. In these cases I have to manufacture the spring from spring strip. This is quite a process and I thought I would share it with you.

Before I continue I feel compelled to say that this is not something you should attempt yourself. Its dangerous when a spring uncoils uncontrolled and you are essentailly dealing with a high speed out of control carbon blade. So dont do it.

My method is very old school because I enjoy setting myself the challenges of the original craftsmen. It produces a much more authenic product and means that I really get to know my components very well. This allows me to predict and tailor how they will perform when installed. And its great fun high kudos clockery of course.

Heres a quick picture journal of one I did today.

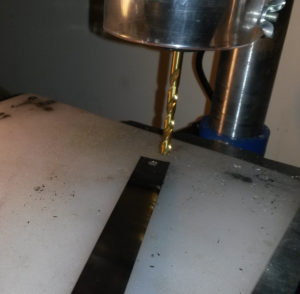
This is the basic raw material. In this instance is 145cm length, 2cm height, and .5mm thickness suitable for a 45mm barrel diameter. Theres a calculation you have to do I wont bore you with.

Bespoke_Clock_Spring

The next shot shows the end holes being drilled. The spring wire is so carbon toughened that you cant drill it without first heating the area to be drilled red hot. This reduces the stresses in the metal, burns the carbon out, and makes it closer to mild steel the more you heat and slowly cool. Drilling still requires a cobalt bit in my experience, or HSS if your on a budget. I normally use cobalt because they are stiffer and hold their position well. HSS tend to skate a bit on hard surfaces and are unusable on a hand drill. My drill is a bench mounted unit which is an excellent investment as a general tool anyway. The bit bellow is HSS simply because cobalts of that guage are quite pricey. HSS is better for larger bits!.

Bespoke_Clock_Spring_Hole

Compressing_A_Clock_Spring

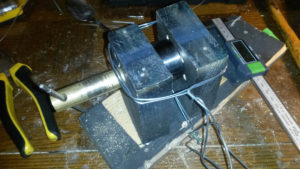
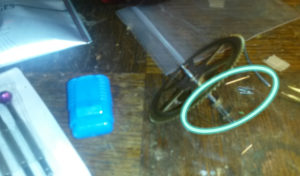
Compressing the spring requires a modern spring winder (boring) or a wooden jig with a central metal core for the winding. The jig needs to be braced with wire before any pressure is applied. Once its tight all round then the spring is wound. The picture above shows the wound spring ready for fixing with a wire retainer.

20160515_202755

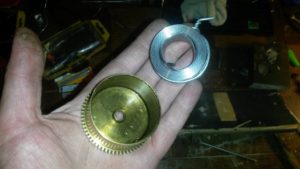
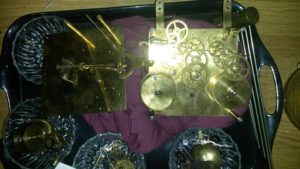
The end result is the bound and coiled spring ready for insertion into the barrel.

20160515_222407

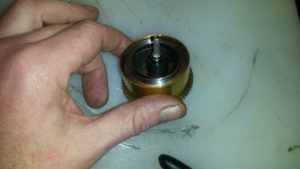
Once the spring is pressed into the barrel its ready to fit the arbor.

Bespoke_Clock_Spring_Arbor

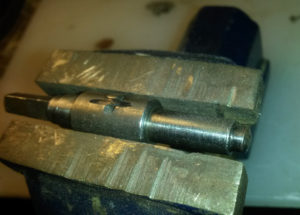
I always cut a deeper fastening point on the arbor for good measure and to ensure it catches the spring firmly if the clock is ever reverse wound (which disengages the arbor so dont do it).

Thats a quick overview of how its done on a bepoke. If its a stock spring you can see which bits I dont have to do although the majority of the work on a spring change is getting the entire movment disassembled as the spring is really deep in the heart of the mechanics.

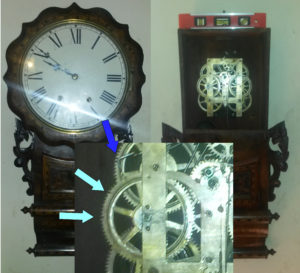
How to tell if your clock spring is broken

If you think you have a broken mainspring and would like me to replace please give me a call. You can tell your mainspring is broken by turning the key – if it meets some resistance and winds a bit bofore “slipping” you know you have a break in the middle of your mainspring. If the key turns with no resistance than that is better news as it means the spring may have slipped its arbor and can just be reconnected as opposed to replaced which is about half the cost.

Main Spring Clock Repair – Modern Bracket Clock

Main spring replacement is something you should consider as part of a regular e.g. 10y yearly, service on a mechanical clock. Over time even the best springs will lose thier power as they are wound and released. If you are thinking of getting your clock serviced because it keeps stopping unexpectedly then think about getting the main spring done at the same time. Yes it does double the cost from about £60 to over £100 but the spring itself accounts for the majority of this higher service cost. Overall, if you plan to own the clock for your lifetime its the best way to go about things and actually cheaper than cleaning and spring replacment as two different services delivered on two jobs.

The pics here show a relatively modern 14″ bracket clock. Its a beauty for a modern clock and really has gravitas in much the same way as a grandfather clock does. Its become another clock on my wish list but that is already impossibly long as I tend to bond a bit with all the clocks I work with.

The pics show the movement re-assembled ready for its new spring and top plate refitting. Note the excellent condition of the movement overall – the point here is that it can look as clean as the day it was sold but over time the spring will wear down. This clock was running consistently for 4 days on an 8 day spring and fading over time. If you have the same problem you know who to call!.

Bracket_Clock_Repair 20160515_021528


Mora Clock Repair

mora1
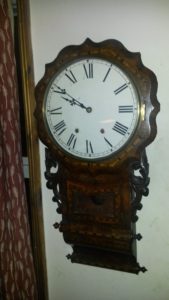
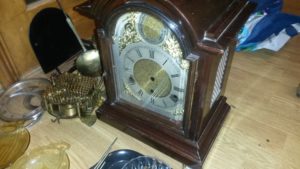
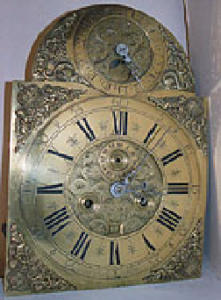
I recently repaired this Mora clock. These are quite rare now and originated from 18th century to the middle of the 19th. They are really good looking clocks and thier shape in sweden is as iconic as the grandfather clock you or I would envisage.

This particular clock is old and I am advising the owners to reasearch it a bit as it is marked A A Anderson on the front who was the very first Mora clock maker operating from Ostnor in the middle and end of the 18th century.

To find out more about Mora clocks visit this link to its Wikipedia entry which covers all the basics.

The main reason for this post is really just to show a rare clock however a few lessons were learned by the owner as part of the repair. The most important of these is that whenever you ship a pendulum clock it is essentail to remove the pendulum. If you dont do this then the pedulum will jump around and either bend, break or crease the leaf spring on which it is suspended. Hope you like the clock and for more about Mora clocks.

VW Camper Van Clock Quartz Repair / Conversion. (Smiths Clock T2 76-79 OE Style Black Face 12v AC957069)

Smiths Clock T2 76-79 OE Style Black Face 12v

VW Camper Van Clock Quartz Repair / Conversion. (Smiths Clock T2 76-79 OE Style Black Face 12v AC957069)


I was asked to do this by a client. Its not that difficult to do but you will need:

  1. Mini or handheld angle grinder iwth thin disks
  2. An electronic quarts movement. Get long one with a 20mm spindle. It doest matter if its a bit larger or smaller by a mm or two. You
  3. A donor clock e.g. a 1970s plastic carriage clock from a charity shop – MUST have a ticking second hand.
  4. Superglue
  5. Araldite / epoxy ashesive or P38. I used araldite but wished Id gone for p38 car body filler.
  6. white spray paint (optional)
  7. blu-tak

How to do it

  1. Uncrimp the brass ring on the edge of the clock with a small screwdriver. Just lift it enough so you can wrangle it off. If you bend it too much you will deform the edge of the brass that shows which is a bit of a bummer dude (hey your probably a surfer reading this article!)
  2. Remove the hands. These are friction fitted pulll off easily.These you are going to replace these although you can use the old ones if you need to. To use the old ones you will have to use your imagination a bit as they are guaged to fit a spindle that no longer comes as an option on modern movements. You WILL however keep the lovely orange ticking hand if you undertake this conversion.
  3. Take of the brass ring and glass plate as well as the inner ring and face.
  4. You will see the movement now. Take it out. It is fixed to the tin chasis at the back on a small solder point. Break this and just get the movement out.
  5. Angle grind the top layer of the jelly mould shaped casing. This creates a nice round hole to work with.
  6. Place blutak on the rear corners of the movment and put it in place so the that spindle is central to the face. Check this by putting the face on. You MUST align the movement to the “12 o clock” postion or it will suck.
  7. look at the back of the assembly. You will see the battery compartment slightly exposed and what you have to cut away to completely expose the compartment. You obviously need to be able to change the battery after all.
  8. Cut / add the battery hole and you should end up with something that looks like an arched door shape.
  9. You can leave the blu-tak in place for the next bit. You need to mix up the araldite adhesive and then pour it around the movment while avoiding getting any on the time adjustment wheel on the movement (or you will glue it in place and freeze the setting of your clock forever!).
  10. One  its dried put the face on again and the black ring. You will notice the spindle is supporting the face. This is no good so cut movement shaped bits of carboard (with a hole for the spindle) and stack them on the front of the movement so that it sits on them as opposed to the spindle. Now glue all the layers together with impact adhesive. The last thing to apply glue to the rear of the face and then place it in position.
  11. Stick a small scredriver into the face plate holes for the two black headed face screws and then simply push them into thier holes. They will adhere with the glue thats soaked into the carboard beneath.
  12. Take the carriage clock you bought from a charity shop that has a seconds hand. You can see it fixes to the face by means of a small cylinder that fits on the seconds hand spiggot. You need just the tube so remove it with a mini angle grinder – you need to preserve as much of its length as you can.
  13. Remove the plastic insert in the original seconds hand that is encased in a spring on the base of the hand.
  14. Insert the spiggot tube you salvaged into the spring casing you now have free on the seconds hand.
  15. Your movment will have come with aluminium plain hands. These can be easily shortened and fashioned with a file or wet and dry paper so they look at least like the originals. You will need to spray paint them white or if you want to be flash, just off white like the originals.
  16. Lastly angle grind off the time changer in the glass in the face. You dont want the bar poking in to set the time anymore so just get rid of it as you will find sombody will push it and shear off the new hands you put on. You can superglue the outher knob on to keep the look.
  17. Put brass glass face on and you are done. One repaired  and converted T2 76-79 OE.

If you cant be bothered with all this you can buy a new one for about £125, but as you can see from the price its time well spent refurbishing the clock. Also you get an accurate modern clock in the van.


#Clockgate

For a very long time now I have waited for a call to come in asking for assistance in repairing a clock that has suffered party damage in the abscence of parental law. Today it happened.  These two are responsible for it. I cannot name them –  on these types of black operations we dont use names.


Copy of IMG-20160501-WA0000

The official story is that they were sipping at a half of shandy while discussing the merits of charity work when they noticed a kitten trapped behind the clock. There was no time to waste as the cat could also have been hungry as well as trapped. Obviously the clock needed hacking into with a fire axe and then a good kicking.

d1 d2I


In normal circumstances it would be fair to predict a really really good hard bollocking accompanied by various agressive sanctions on personal freedom and finances. That is unless you can get some idiot to come out on bank holiday Sunday, not charge you a fortune and enter into the conspiracy with you. It would also be a bonus if the same person could get the clock running and actually leave the clock better working order than before it was abused by the reckless actions of a kitten.

Copy of IMG-20160501-WA0004

All part of the service and a landmark day for me. Thanks guys.


About Pocket Watch Repairs

deco2
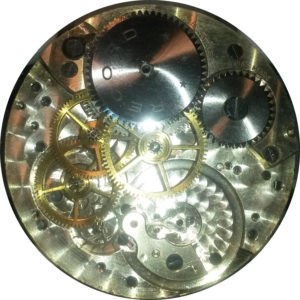
Pocket watches are great fun to work on. Its the mechanics that constantly amaze me on older watches. They will stop if you dont get them serviced every few years because they are very very sensitive to the accumulation of dirt. How does the dirt get in there? you might ask. The only way it gets in there is from particulates in the air that you cant see. The watch could condense these out of the surrounding air if it is cold and brought into a hot environment. The other big one of course is smoking. If you smoke your gunging up your clocks much much faster than normal – I know becuase most of the cleaning I do for restoration is infact nicotine and dead skin – mmmm lovely (I still love the job).
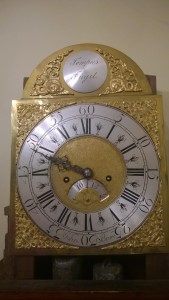
Anyway this is a pocket watch a did recently. You can SEE all the components and how they communicate forces between each other. If I get a TAG Hauer or a Burberry in (two recent jobs) its just a matter of replacing the whole movement becuase they are mass produced and the same movment will be used by completely differen manufactures. Frankly its boring work to do as a clock repairer and I far prefer pocket watches.

This picture shows an old British Rail station masters watch innards. From the top down you have the drive wheel and additonal cog that keeps the movment going as you are winding it up (clever). The brass cogs then gear down the power and deliver it to the escapement wheel you can see at the bottom under the last brass cog. This escapament cog is always under tension from the spring and is alowed to advance one tooth at a time by the back and forth movement of the flywheel. This regulation between the flywheel and the escapement wheel is managed buy the pallet fork which you can just see sticking out from under the escapement wheel. This is a see-saw affair eith the wheel at one end and the pallet fork at the other end. You can see the other end of the fork in the picutre as they are red jewelled rather conveniently. The picture doesnt show the flywheel which I have removed to show the whole drive chain of cogs.

So if youve wondered what all the gubbins inside the pocket watch actually does, now you know. Its not a complicated machine but that means it has to be very finely engineered as well, hence its sensitivity to dirt build up from the air.

Hope this enlightens you.

John Bruce Grandfather Clock Repair – Nice older clock

WP_20160411_006

I have been asked to repair this grandfather clock, specifically the pendulum spring which requires replacing and riveting.

As a bit of practice I had a shot at accurately dating this clock from its features.

I had a good look at the dail composition, the engraving quality, the half hour markers on the chapter ring without quarter markings and the basic construction of the brass back plate (which uncommonly, is two connected plates).

The quality of the chapter ring was surprisingly good – it looked machined or turned at least although there is one small casting fault on the edge of the ring at III. The engraving looks hand performed with some tooling marks apparent under close inspection. The centre of the dial features some basic engraving around the date ring but is not of the same quality as that on the dial. The rest of the engraving on the plate e.g. tram lines on the perimeter, is also simply produced by hand. This contrasts with the spandrel which are are well cast, quite detailed and good quality with a marine theme. They are also original to the clock as there are no signs of redundant holes in the back plate. It is, as far as the “clock” is concerned, a nicely original item. Having considered all this it suggested the clock was 1730 as this is when these various features would have been concurrently evident on the dial.

I was therefore somewhat grattified when research revealed that John Bruce started his apprenticeship with John Perkin in 1723. It is known that Perkin was making clocks in York in his own right by about 1730. This ties in with the owners belief that it was a norther clock although the case was surpisingly reserved compared to later northern clocks I have come accross. Apologies for not including a picture of the case – I will add this later when I return the repaired pendulum.

Interestingly I found a picture of a John Pirkin clock which shows what he was capable of and would have driven John Bruce to aspire to ((pic on Brian Loomes’ site)). The Bruce clock I am working on is less sophisticated mechanically and decoratively compared to the Pirkin clock so I expect the clock I am working on was an early one for him. There are of course people who know more about these things than I do so any comments on this post would be most welcome – as a clockist I am information hungry!. If Im wrong I prefer to know and never take it personally.

If you are reading this and have a grandfather clock to date please do feel free to email a picture and I will publish it here with an explanation of the date I believe it was made.

Below: The Perkin Clock – click the pic to visit the site source, Brian Loomes excellent site and source of information. He also writes excellent books packed with information in an interesting narrative format.

JohnPerkin1720to30