An unexpected clock repair that should have been done under the manufacturers warranty!

WP_20160327_002

While out at a customers house installing a repaired clock I was shown this rather nice bracket clock from the 1980’s. Its whats knows as a jewellers clock which means a jeweller will buy in good quality unbraneded cases and movements allowing them to assemble and sell thier own clocks. This was common practive before 1900 or so as most clocks were still being hand built to some degree at that point. The practive still exists today with things like Burberry watches that use another manufacturers high quality movements, but not so much with larger clocks.

Anyway I was being shown this clock and I decided to check the chimes out. The tune that emerged, while perfectly accurately synchronised and delivered… .sounded wrong. I commented to the customer that it sounded like the chap in the factory had installed the mechanics for a westminsted chime and the chime bars for something else!. The customer said that he had thought he bought a westminster chimebut had only discovered this was not the case when he got it home.

The movement was a reltatively common Franz Hermle 350 series (350-021 to be precise) so I knew that it would be capable of taking the westminster chime mechanics if I could find them.

I took it back the my clock  cave, lit the candle, and proceeded to investigate..

It was obviously working perfectly in terms of its beat and keeps excellent time. You would actually expect this from a clock that was made by a good manufacturer with a modern mechanical movement, so no surprises there.

I took it apart and halfway through recognised a couple of components I had seen on a westminster chime clock that were specific to that type of chime. It didnt make any sense until I realised that the chap who built the clock had fitted the chime bars in reverse order. This resulted in the middle two notes being in the right places pretty much and the top and bottom reversed. You could still recognise it as the westminster chime sequence if you knew thats what it was supposed to be, but very badly out of tune. 30 years of that.

A fast clock reapair and a great story!. If you have any similar stories I alwasy enjoy hearing such stuff so either post a comment on this page or send me an email and Ill publish it up on this blog (anonamously if you prefer).

WP_20160327_008

German Lantern Style Clock – A repair article with a few tips on mending chimes.

Pendulum_Wall_Clock_Repair_Complete

The clock and its movement

Its not necessary to gain this knowledge for repairs although the best of luck if you are learning and I hope my general articles help. For the average reader or clock enthusiast this is not really the value of this article. It is that once you understand the basics of a movement and, later on, the various historical modifications, you are far better equiped to value and buy a clock for the right price. I have found it makes owning clocks more interesting and it gives a new level of focus in the pleasure of ownership. Its a bit like knowing your way around a car engine – if you do, you wonder how everyone else who does not manages to get by.

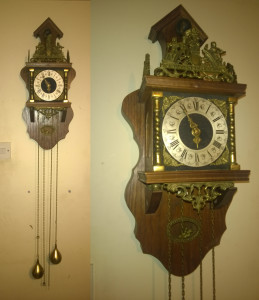
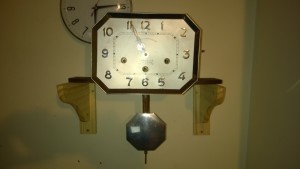
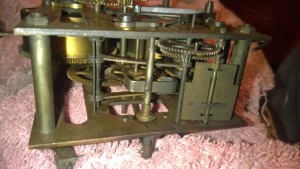
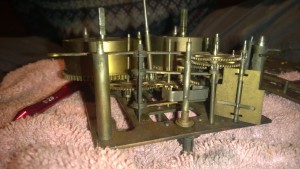
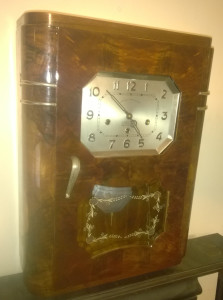
Before I talk about the repair I would like to talk about this good relatively modern classicly styled clock. This came to me in a box with the chains tangled and slipped inside. Once I got it back to the ranch and put it up I have to say its rather impressive and dramatic. Incidentally the pictures showing the movement later make the clock look small (the movement is small), but its quite large. Including the trailing chains probably 5ft with a 10″ wide head.

This one has a movement from probably about 1950 – 70 although it could be later. I have worked on many mechanically similar clocks and Ive come to respect them for what they are.

Complicated clocks with chains and chimes can be painful and expensive to own if they are old. Theres more to go wrong on them and they frequently slip thier chains if you knock them or the whole thing tumbles on the floor when the chains get snagged or pulled accidentally. For an old clock either scenario  can means a long corrective process. Old clocks also seem to almost  be designed to hamper access and require exhaustive dissasembly to access most of the areas where common problems centre upon.

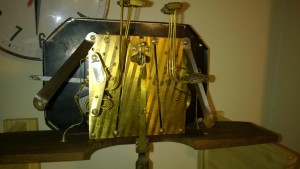
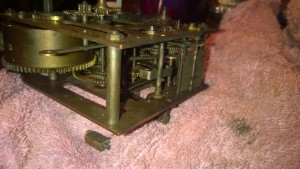
The later clocks are the opposite. This one was relatively easy to untangle and was designed for simple maintenance access. I can just tell my looking at it that the clock will keep excellent time even if its off-beat, whereas older wall clocks can be stopped by a door slamming.

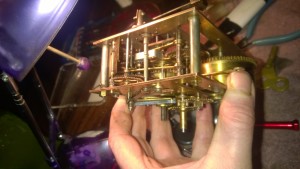
As you might be able to tell I am a fan of these relatively modern clocks and their bullet proof simply manufactured movements. I actually used a movement from one of these clocks when I built a sort of demonstratoin clock. It had the mechanics exposed around the chiming mechanism so I could show people what I was boring them about. Hours of fun.

What I really like about them apart from the ease of repair and reliablity is that they are still purely clockwork despite being manufactured in an age where a quartz movement costs pence and does a better job on paper. “No batteries required” and that has kudos. I say that even though even though at least a quarter of my clocks are vintage electrics which I also love.

Repairing the Chimes and a few other things along the way.

Note that all this really only applies to movement above 5″ square on the backplate. Other methods of construction and component space useage start to kick in below that.

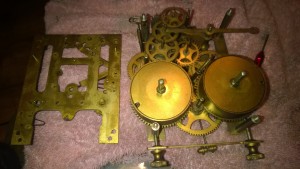
In terms of this repair it was a case of fixing what had been done before as it were. I got the distinct impression I was not the first to attempt a repair on this clock. You can sort of tell after you have been repairing clocks for a while – the clock is not in working order and there is normally a spanner sticking out of the side, or its on fire – well to a trained eye thats what it looks like anyway.

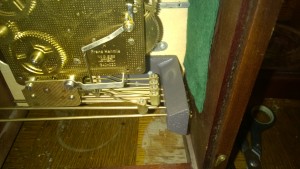
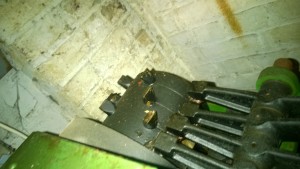
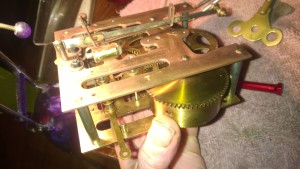
Having assembled to start with I found that the chime was functioning on the half hour, but not on the hour. To do this I hung the weights, applied the hands and simply advanced them slowly listening for any levers or cams droping. If you hear a drop and the clock doest strike within a few minutes then you have a jammed lever or cam to take care of. It is indicative of problems on the front side of the top plate which is generally reserved for the various camms and levers  that calculate how many hours to chime.

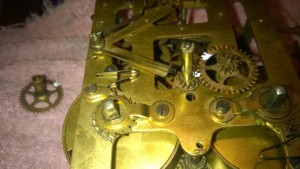
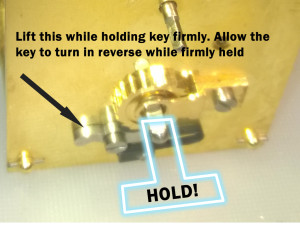
A good tip for investigations in this area is to remove the top second hand sleve so you can see what is pushing what.To do this you will have to remove its drive cog that is offset and meshes with it. Its the only other cog near it so you cant miss it. Normally its attached with a lynch pin or circlip. It almost looks possible to remove the second hand sleve without taking off the cog to the side – its isnt, and it never is, so dont try as you can damage or bend things.

BEWARE: If you warp a cog anywhere on a clock its game over so never lever them off with a screwdriver or suchlike (or anything). Always pull a cog from multiple grip points and be sure its actually supposed to come off by design. Also consider getting a mechanical pulling tool, it is less expensive, emotionally at least, than facing the acceptance of the fact you now own a box of assembed spares formerly called a clock.

Pendulum_Wall_Clock_Repair_Movement_Parts

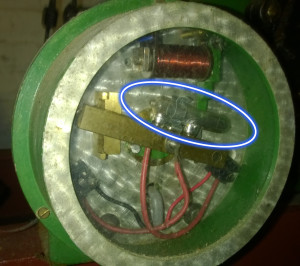
Once you have the second hand sleeve out of the way its just a question of connecting the minute hand and advancing the clock so see how the camms and levers react to pushes from the central spindle cam.

You will have to do this with the left hand weight connected to provide power to the chiming mechanism. If you connect only the left weight its still possible to lift the movement and weight with one hand. This allows you to rotate and look at whats going on from different anlges which is esentail as you have to peer through gaps to see some of the mechanics function in their relay of operations. Ideally use a jigg – which can be two bricks as long as its solid.

Take the time to slowly watch whats going on. Its all a perfectly logical sequences you can see mechanically playing out. It looks complicated at first but if you slow down it starts to make sense and the penny drops. It all comes together and you see what is going on overall and in detail.  Once you have got to there its not hard to see the point at which things stop and why. With this this clock I did exactly that and it soon became apparent that the lever arm that sets off the hour chime was not pushing up far enough to release.

When you look at a problem like that its important to bear in mind that clock parts are always made to fit snugly together even where they have play in thier movement – any play or movement in componets is either controlled or calculated precisely within the design. Obviously you have to differenciate between this and “actual wear” but its possible to do that in most cases with a bit of experience.

That means if you find a component that is bent or out of place its highly likely this is prior human intevention of some sort – a screwdriver stuck in for a wiggle can really mess things up for instance. Things dont bend inside clocks on thier own – its a sealed unit for most of its existence and accidental damage is almost exclusively to the exterior.

In short, sometimes you have to physically bend components back into form and you should not be scared of doing so. This is of course providing you understand exactly what its going on in the mechanical sequence and the precise shortfall in the chain of events. When you first start reparing clocks its easy to pull your hair out looking at a design or mechanism only to find that you are trying to work out somebody elses mistake as opposed to the manufacturers intented configuration.

It really is essentail that you understand exactly what happens and in what order, so spend a lot of time simply viewing the thing working. All clocks work fundementally the same way but there are subtle differences everywhere that are more than likely something you need to know.

It does help of course to have done this before and I am not seriously recommending a beginner dive in and have a go but…… if you have a clock broken beyond repair, I highly recommend an autopsy in this area as once you understand the front of the clock, then the mechanics of the drive components are easier to understand.


This was a fast job to do becuase ive done a few of these but also because the clock was so well thought out in its general engineering design. Bearing in mind it was a strip down with a diagnosis, component correction and recalibration it shouldnt really have been a same day job but thats how it worked out. Marvelous.

Minute hand has come apart on my cuckoo clock

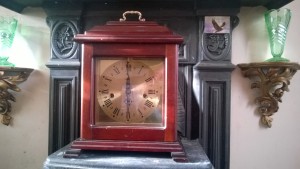
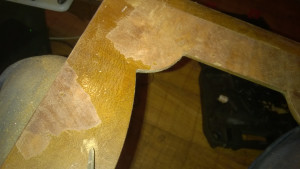
One more thing with these German Cuckoo or chunky handed clocks. Because your going to have to take the hands off to get to the rest of it you need to beware of the “Minute hand has come apart on my cuckoo clock” syndrome.

These rather rustically fashioned clock minute hand falls to bits so that the sleeve with the square recess for the spindle (which looks like a washer with a square centre) separates from the hand. This happens, in my experience, because wood glue alone is used in the join although ive seen the same problem on chunky metal hands too. Its odd for Germans to consitently engineer something badly so there may well be a reason. It could be that it was a clutch style fit between washer and hand to completely get rid of the aformentioned problem and make the join stiffly adjustable, but all the examples I have see have been loose fit and strong glue seems the best solution.

Anyway… this is not as simple as it first seems.

This needs to be glued together but it MUST be oriented properly – you cant just glue it in with the square in the centre in any old radial orientation – its got to be line up with the square on the spigot on the strike of the clocks hour. If you dont do this the clock will always annoyingly sound the full hour at seven minutes past, or some other incorrect value. The only way to put it right is to re-break\re-glue the hand or alternatively take the clock completely apart to the central spiggot and put it back in rotated 7 teeth reversed (or whatever the offset is).

To do this put the washer on the square spindle base and turn it slowly. When you hear the main sequence chime go you know that the clock thinks the minute hand is pointing straight to 12. Now you can glue the hand on the washer with superglue in the correct orientation.

BEWARE: However tempted you may be to glue the hand onto washer while its sitting nicely placed on the spindle DO NOT. If you get glue between the spindle and the second hand collar you could ruin the clock. Use the washer in place on the spindle, place the hand on it, and then pencil mark the positioning of each on the edges so you can take them off the clock, match them up and then glue them. The only reason I mention this is that it happened on this clock and has done so on every one of these clocks and cuckoo clocks, Ive worked on. What people do who lose the pieces I dont know – the wooden ones are handmade and I think it would be very hard to get an exact hand match to the second hand. That means two new hands and almost certainly in a different wood grain or shade. Keep hold of your hands.


Pendulum_Wall_Clock_Repair_Movement


Burpett Grandfather Clock c1700 discovered on my travels

Burpett_Grandfather_Clock_c1700

BannerGrandfatherClock.fw
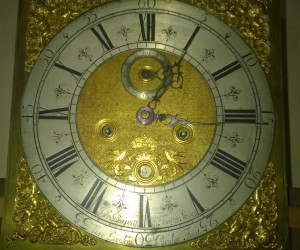
I have found a rare grandfather clock in the Braintree district.

I was asked to repair the grandfather clock pictured. If im asked to repair a clearly ancient clock or something of particularly high quality I will always do a bit more homework to make sure I really know what I am dealing with. Some clocks I have to pass on because the right thing to do is an engineering restoration where processes such as acid etching and metal plating is undertaken within specific tollerances – really advanced stuff requiring industrial processes at a small scale tailored to the clock in question. This is one of those clocks. Its not run because the minute amount of wear incurred will over centuries eventually cause wear and failure. Its a bit like keeping neolithic cave paintings in the dark to preserve their colours – you are extending an already long lifetime in the interests of truely long term preservation. Basicly IT BELONGS IN A MUSEUM as Indiana Jones would say.

The research on this particular item was really quite exciting because of its age and also because there really are not that many grandfather clocks made prior to 1700 . It was before the industry really took off and was pretty much confined to London where the the big names of the era evolved with a low output of high quality clocks although volumes really increased a great deal nationally by the middle of the 18th century. Early London clocks from 1680 to 1700 are sought after by collectors and they have an almost relic like quality and appeal. Some early long cases and grandfathers were produced between 1658 and 1680 but they dont come up for sale and I dont even know where you can see one on public view.

This clock was made by John Burputt who was a maker around 1700 and later in Londons Tooley Street having apprenticed at another London maker. He wasnt one of the mega famous makers but its rather like being in the champaign region – it doesnt matter if your not a huge label – its champaign!.

The street is no longer called Tooly’s as it is spelled on the clock face which is interesting in itself. This is a long street that is now the A200 wich would have terminated at the Old London bridge site that was 80m further down the river than it used to be (if you really want to envisage the location as accurately as possible!). He made some very good quality clocks, some with spectacular finishes in the woodwork – typical high end production of the time.

All the skills evident in the production of an early London clock appear too good to be of the era when you look at them closely. Its because clocks were at the very top end of the luxury market at the time and the engineering was esquisite with competition to produce ever more accurate clocks as almost a fashion. Burputt had what I assume was a prestige address on a central and very busy trade route from London so he must have been a well know maker among his peers who were an list of now highly regarded makers. This was at a time when London bridge had properties and shops built on it – the countrys first shopping mall in many ways. Anyway its got all right check points for an early clock including the inscription on the bottom of the dial that reads “Near London Bridge Facit”. Facit is a latin term used by artisans of the time meaning much the same as “made here / made by”. If you see a clock at a boot fair with that engraved on its worth buying.

I dont come by something like this often so I thought I would put a post up pretty much for early clock fans who will find very few pictures of a Burpett online and not close up pictures of the dial and chapter ring.  fans who I am sure will find this among the relatively low amount of internet listing on this.

There are apparently only 5 or so other Burpetts still in existence or known. Great Find.

1980’s Bavarian Cuckoo Clock Repair

Bavarian_Cuckoo_Clock_Front
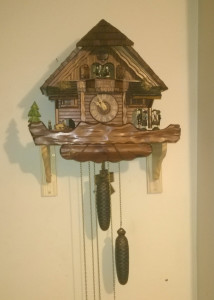
As well as the more conservative wall clocks I repair the delightful cuckoo clock. Please ring me for a chat about it – its has to start with a chat when its a cuckoo clock!. Please first have read about a recent job and have a quick click on the 2 second video to see one working from the back. I inlcluded that because I wondered how many owners might not have seen what goes on in the inside – its as much fun as watching it from the front to be fair. Anyway….
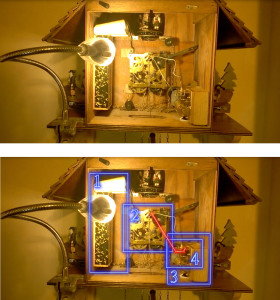
This repair took a very long time at 30 hours which had to be completed in a sequence of three contiguous shifts. I repaired it and I wont go into detail as its quite boring. What is not boring is the clock overall. Its an exciting frankenstien fairground ride sort of clock with the hallmarks of insanity.

Every clock I repair or refurbish is new to me. Its quite rare to work on an identical movement model simply because of the sheer quantity of movement types that have been produced. Add to this the fact that many european clock manufacturers bought in movements from competitors and you start to see why.

This means every clock repaired has to be understood mechanically before you really get to work on it. You have to check for a number of mechanical features and then work out how they interconnect to achieve the overall objective.

The following pic shows a rear view of the clock on a wall jigg. Note the flexible lighting at standing eye level, which you soon learn is the only way to work on these things. The weights are long and the head is oddly weighted. In addition the drive chain has a complicated route and can snag if not installled at the right tension.

Bavarian_Cuckoo_Clock_Parts_Diagram

Understanding a clocks mechanics to the point where you can see it all working in your minds eye, is a hard thing to do with a cuckoo clock bacause its “modular”. It is infact 4 separate systems synchronised together, each with their own routine that they execute when triggered. For example, the music box (diagram item 4). This is released to run its tune at the alloted time and then brough to a halt again by a lever (diagram red line) dropping from the main movement (diagram item 2).

At the same time as the movement is starting and stopping the music box, it is also pushing the bellows (diagram item 1) via a lever that makes the cuckoo sound which is two tone and has to sound right on the timing. As well as this, the movement is running the gears that drive the automators that make the figurines rotate to a set patern. All this has to work together like a brass band.

There are no settings or markings evident in the clock – nothing to go by if your trying to work out how to synchronise everything correctly. Thats really why you need somebody like me to look at this. While I completely advocate self service and publish tutorials on this blog, this is a job for somebody experienced.

Fundementally these are complicated clocks to repair overall, although in terms of thier mechanics they are no more complicated than something like a vienesse regulator wall clock…its just the way is all arranged  in there and the quantity of separately functioning, but interconnected, units.

Not surprisingly all the parts are clearly hand fitted internally with screw holes and positioning having been decided at the time the clock was being assembled. The wires that constitute the levers between the movement and the components are all hand bent to avoid obstacles, sometimes into convoluted shapes.

These things are a delight to own even if you think you wont like one. You only have to see a good one working to fall in love with the things. This two second vid shows it all working away.


I suppose the tall and short of this is that if you would like me to repair your cuckoo clock I will need to have a good look at it before quoting a price. Bear in mind that the job above was a complete rebuild and reconfiguration. Your clock might be as simple as a jammed linkage in the chain which is straight forward to adjust.


Dating a Grandfather Clock

Ok so youve got a grandfather clock and you want to know roughly how old it is. Here are some basic paramaters to allow you to see the date ranges of the various features so you can get an idea without doing a whole load of reasearch on makers and suchlike.

The first Grandfathers produced 1660 in London because Christian Huegens invented the pedulum clock. Before this clocks were…well they sucked really as timekeepers. If a clock lost 5 minutes a day it was doing well but with the pendulum clock you could get it down to 5 minutes a week. The pendulum clock was therefore a very useful thing but of course you needed a long case to cover the long pendulum (the longer the more accurate) and the Grandfather or Longcase clock was born.

All had SQUARE faces without the arch on the top until 1700 when the arched dial was introduced. The square dial persisted until 1720 by which time it was going out of fashion ans was completely replaced by the arched dial (with exceptions of course) by 1730.

All faces were brass up until 1770 when the painted dial came along. Less expensive to produce and engineer it became the favourite for the majority of clocks produced outside the cities. London clocks by the “names” continued to be brass until the decline of the grandfather clock production in about 1860.

In 1660 clocks were tall and thin with small faces. 200 years later they were tall and fat with big faces. The change was gradual and so the size of a clock can often date it within 50 years or the 200 years from 1680 to 1880 when clocks stopped being produced. Clocks produced in the tended to be a bit more brash and large to their contemporaries in London so you need to adjust for that a bit in the date estimate (if the clock is from a norther maker).

If you have what looks like a tall thin clock with an old small square clock face it could be valuable. Some of the early makers command huge prices. HOWEVER, its more likely to be a “cottage style” clock as the thinner shorter style was adopted for smaller rural properties throughout the history of clock making – this makes it quite difficult for a novice to tell the difference between an early london grandfather clock and a later cottage style grandfather clock – they will share the same proportions in many cases.

One handed clocks – if you have one of these then you probably know what you have already. Clocks in the first 50 years of production were one handed – no second hand. When grandfathers came along the makers added an extra hand BUT they kept the old dial markings for the one handed clock> This of course meant that the clock could be read only by the hour hand by those not used to the “new fangled” second hand. These markings are on the inner edge of the dial plate in quarter hour segments which are themselves separated into half quarter hours. On the outside of the ring you will also find the more traditional markings we are used to for two handed reading. The clock has two sets of markings because it was produced in the crossover period of 1660 to 1710\20 when people expected to be able to read the time one handed and two handed.

If you see that then your clock is really quite old and you need to get a valuation. Clocks prior to 1700 are actually quite rare and shouldnt be run – “THAT BELONGS IN A MUSEUM” as Indiana Jones loves to say.

I prefer to learn from books rather than the internet. I find it altogether easier and more portable. I can highly recommend Brian Loomes as a source of good books on antique clocks and he has written one specifically on grandfather clocks that will tell you everything about you current clock, and importantly, how to spot the lemons when you are buying one. Hes a good writer who packs an enormous amount of knowledge into a page which is actually what you want rather than someone who uses too many words to bang on and on. Heres the link http://www.brianloomes.com/books/books.html which will open in a new tab so this one stays open and you can come back!.

Im always interested to see what people have so if you want to email me a picture of your clock Ill get back to you with a basic evaluation, and of course if you want it serviced I will be more than happy to help local customers. Email me at admin@braintreeclockrepairs.co.uk.

Hope this was helpful – Next up is a basic post on the basics of value and age.

Braintree Town Hall Clock

Firstly I would like to thank Anita and Andy at Braintree town hall for allowing me access to the tower clock. They were incredibly helpful and clearly take great pride in thier resposibilities which include the clock of course. I had an excellent visit and I wanted to share this on the website so here goes…

This is the clock – anyone from Braintree will recognise it and its sound. Before I start I think its fair to mention that the clock now runs electrically because this provides the best time and cheapest maintenance for the taxpayer. It doesnt matter as Gillet and Johnstone (www.gillettjohnston.co.uk) who provided the original mechanical movement have supplied the electric version BUT have been careful to leave the old one in place as the pictures show.

WP_20160226_002

Not that this part has anything to do with the clock itself, but to get to it involves a rather elegant spiral staircase that I expect not that many people in Braintree have been up. From this you access a room that sits directly in the stone cube you can see that the clock stands on.

WP_20160226_017 WP_20160226_024

The clock originally had a complete mechanical movement. Real big clockwork stuff as you can see. The main pendulum is incredibly heavy and still works. The clock is contructed of the main movmement which you can see in the centre and the two motors that drive the bell pulleys.

WP_20160226_006

On each side of the movement you can see the drives for the bell pulleys. I wont bore you with the details of how all this connects up to strike the correct hours and quarters, however, you can see in the picture below the cams that conrol the order of the striking notes. This method is the same in all clocks pretty much and you will see a similar cam on the back of a quarter chiming mantle clock albeit minaturised.

WP_20160226_010

Another nice touch is the mercuring swithching which you wont see in a mantle clock!. This involves a rotating drum and something that looks like the inside of an egg timer. The basic priniciple is that when the clock progresses the drum is rotated slowly until the mercury can flow over the switch to compete the circuit and bring the motors that drive the chime to life. In a smaller clock the same thing is achieved with a lever that trips the chiming mechanism into action.

merswitch

The clock has been updated by Gillet & Johnstone with an electronic control mechanism – mercury, while great fun and functional, is a bit dangerous in quantity and had to be phased out of the equation along with the majority of the mechanics. Briliantly, all the original mechanics and mechanisms remain. Perhaps one day it will be fully used again.

WP_20160226_019

Anyway I had a great time being shown around so thanks Anita & Andy. I hope Gillet and Johnstone go on for years and years as I cant repair this one. I dont have the required 9ft pliers and welding equipment. Yet.

Now you know what a clock repairer does on when he is not reparing clocks. More clocks :-).


Repairing Wall Clocks from the 1930’s

I repair all types of clock including long case and grandfather clocks, however, Ive been asked to refurbish a few 1930’s clocks recently and I thought I would produce a post about this.

Wall clocks from the 1930s are a delight to restore and repair simply because they are so iconic of their era and are exceptionally pleasant on the eye with thier modernist lines and flowing curves.

A few things to watch…

WOOD!. Most of these clocks are veneered thinly – maybe 1 or 2mm depth becuase of the expense of fine hardwoods at the time of production. This means that you are going to have to get your oil paints and french polishing clobber out at some point to disguise the inevitable flakes and gaps in the veneer.  I use artists oils as they provide a hard finish with thick paint that can be sanded (with wet and dry as opposed to sand paper, and finshed). With a bit of practice (ehem!) its possible to completely mask gaps in wood and veneer wear.

painting

PAINT! The other thing that really need to look out for when repairing or restoring a clock from the 1950’s or earlier is paint solubility. Most clock faces were printed with the silk screen or similar techniques. This is not a problem in itself, however, you will find that most modern solvents are likely to simply wash off the print. This is a disaster if you, by accident, erase the makers monogram from the face as it is extremely hard to replicate these, if not impossible. Use only SOAP and water and elbow grease to get off the years of nicotine that tends to cover the faces and other decorative parts of the clock. Incidentally you may find the more aggressive cleaners like Flash or Detol sprays actaully take the paint off too – just use washing up liquid diluted 20:1. It takes much longer but its the safest way. If you are going to use solvent e.g. acetone / nail varnish remover then use a cotton bud and do not let it come into contact with any of the numbers, letters or other printed writing.

Lastly, be careful with the movment. These tend to be quite complicated. The movement below is typical with a quarter hour chime, two hammer sets, and exposed from face mechanics. Its not a disaster if you move it out of sync, but if your not a clock enthusiast or repairer then leave this element of the clock as you find it i.e. dont move the hands or mechanics when you remove it to restore the case.

If you movement is a quarter chime and the back plate is patterned then you have a good clock. If its just a fairly basic industrial looking movement then look to replace it as part of the refubishment – they are can be bought second hand. The reason I say this is that the cheaper movements were not really designed to run for more that 50 years and often not that well during this period so if you want an accurate as well as a beautiful clock then its time to change that old clunky worn movement.

Dont worry too much about replacing the movement as far as the overall clock values goes – the majority of the value in these clocks comes from the deco design of the case. The more deco it looks, the more it tends to be worth. This is not the rule for all clocks so dont go taking the same advice on your Tompion £2 million clock – just these deco ones from smaller makers. The one below is from a Jeweller in Bologne France. The shop is still there my friend tells me.

WP_20160203_002 WP_20160203_003 (1)

How to clean a clock movement

This is not really a guide on a blow by blow basis; its really more of an expansion of a previous post (https://braintreeclockrepairs.co.uk/2016/01/16/how-to-service-a-carriage-clock-yourself/)

Read that if you want to know how to perform the mechanics, this post just shows the progression of taking the movement apart and some cleaning tips.

Providing you are reasonably competent from a mechanical skills perspecitve cleaning a clock is well within your capability. There are a few tricks but basicly its dissasembly, cleaning and then re-assembly in reverse order. The following slides show an 8 day movement. It has a one tone chime and strikes the hour and the half hour. Not the simplest of movements but not the most difficult either.

This assumes you have taken the movement out of the clock already. In this case I removed it from a viennese regulator I had in for a full service. Note the that movement sits on a towelling rag all the way through. This is excellent for balancing and holding the movement firmly but without being too firm as you need to move the whole thing around quite a lot with your hands.

WP_20160216_007WP_20160216_011

The two shots above demostrate very well how dirty a clock needs to be before you take it apart. This one was actually stopped when it came to me as the black oxides on the metal had become so thick that the interfered with the mechanics on the moving parts such as cog faces and spindle axles. Add to this the contiual build up of dust in the oiled spindle holes (to form a resistant gunge) and the clock simply wont work properly.

WP_20160216_014 WP_20160216_015


You will need to remove the central spindle components before taking of the top plate. Apart from this most of the mechanics on the top plate are self contained and come away with the plate.

WP_20160216_018 WP_20160216_023

Once the plates off then take a set of photos of the cog layout. You will refer back to this on re-assembly. Also, note the photo that shows the parts layed out for cleaning in the order in which they were removed. You will find that you must follow this order of re-assembly, or the cogs wont all fit!.

WP_20160216_026 WP_20160216_028

Clean the cogs and the plates. Simple. Use a toothbrush and regular cleaning materials. Dental floss brushes are excellent for getting into the spindle holes on the plate which really do need a thorough clean out.

WP_20160217_003 WP_20160217_004

At the end of this long process you will end up with beauty!… as well as working clock.


How to unwind a clock

This post tells you how to unwind a carriage clock. The same method can be applied to almost all other mechanical clocks. If its a big clock and you are not confident then get somebody quite strong and mechanically minded to do this for you. This might seem extreme but there is a lot more power in a spring than you think and its easy to get caught out and injure yourself with twisted or broken fingers.

Before anything else, PUT YOUR PROTECTIVE EYE WEAR ON. If you dont have any go and get some. It really isn’t worth proceeding from this point onwards without it. The risk is high quite frankly and I was stupid enough to have a couple of close calls before I got the message. Don’t do the same as you might not be as lucky.

To unwind the clock you will obviously need the key. If you don’t have a key don’t unwind the clock or go any further until you have a key that fits.

The reason for this is that you need to hold on to the key while you release the ratchet that holds it against its spring pressure. When you do this, if you don’t have a firm hold on it, you might find it spins out of your hands or even get thrown off its spigot towards your well protected eyes (clever you with your protective eye wear on!).

Sorry to go on about this but the risk is high compared to other things that you would normally wear protectives for.

Have a good look at the picture below and hold onto that key before you release the ratchet. Once you have released the ratchet you will feel the pressure of the spring through the key you are holding.

Unwind the carriage clock in half turns and release / apply the ratchet between the turns so that the spring pressure is always managed by either your fingers with a firm hold on the key, or by the ratchet being allowed to stop the backward movement.

IF YOU RELEASE THE KEY WHILE THE RATCHET IS OFF THE CLOCK MAY SLIP ITS MAINSPRING. So…make sure you have the key under control at all times when the ratchet is off.

UnwindRatchetCarriageClock